
Prompt Studio
Stress Testing lives inside Prompt Studio. Learn how to build, test, and version prompts.
Why Stress Testing Matters
Without systematic reliability testing, a prompt that works once might fail unpredictably in production. Netra helps you answer critical questions with confidence:Core Building Blocks
The Stress Testing framework is built on three interconnected pillars:Models & Runs
Configure which models to test and how many executions to perform. Netra runs your prompt repeatedly against each selected model to surface inconsistencies that single runs miss.Your currently configured model in Prompt Studio is pre-selected as the first model. Add additional models to compare performance across providers like OpenAI, Anthropic, and Google.
Evaluators
Evaluators score every individual run against your quality and performance criteria. Netra provides 6 evaluator types:
Each evaluator supports pass criteria — numerical thresholds (e.g., latency < 2000ms) or boolean conditions (pass/fail) — so you define exactly what “good” means for your use case.
Results & Analysis
After all runs complete, Netra aggregates scores and generates actionable insights:Step-by-Step Guide
Prerequisites
- A prompt with at least one message in Prompt Studio
- All prompt variables filled with representative values
- At least one model provider configured in your workspace
Run Your First Stress Test
1
Open Stress Test Configuration
In Prompt Studio, ensure your prompt variables are filled with values that represent real usage. Click the Stress Test button next to the Run button in the actions panel.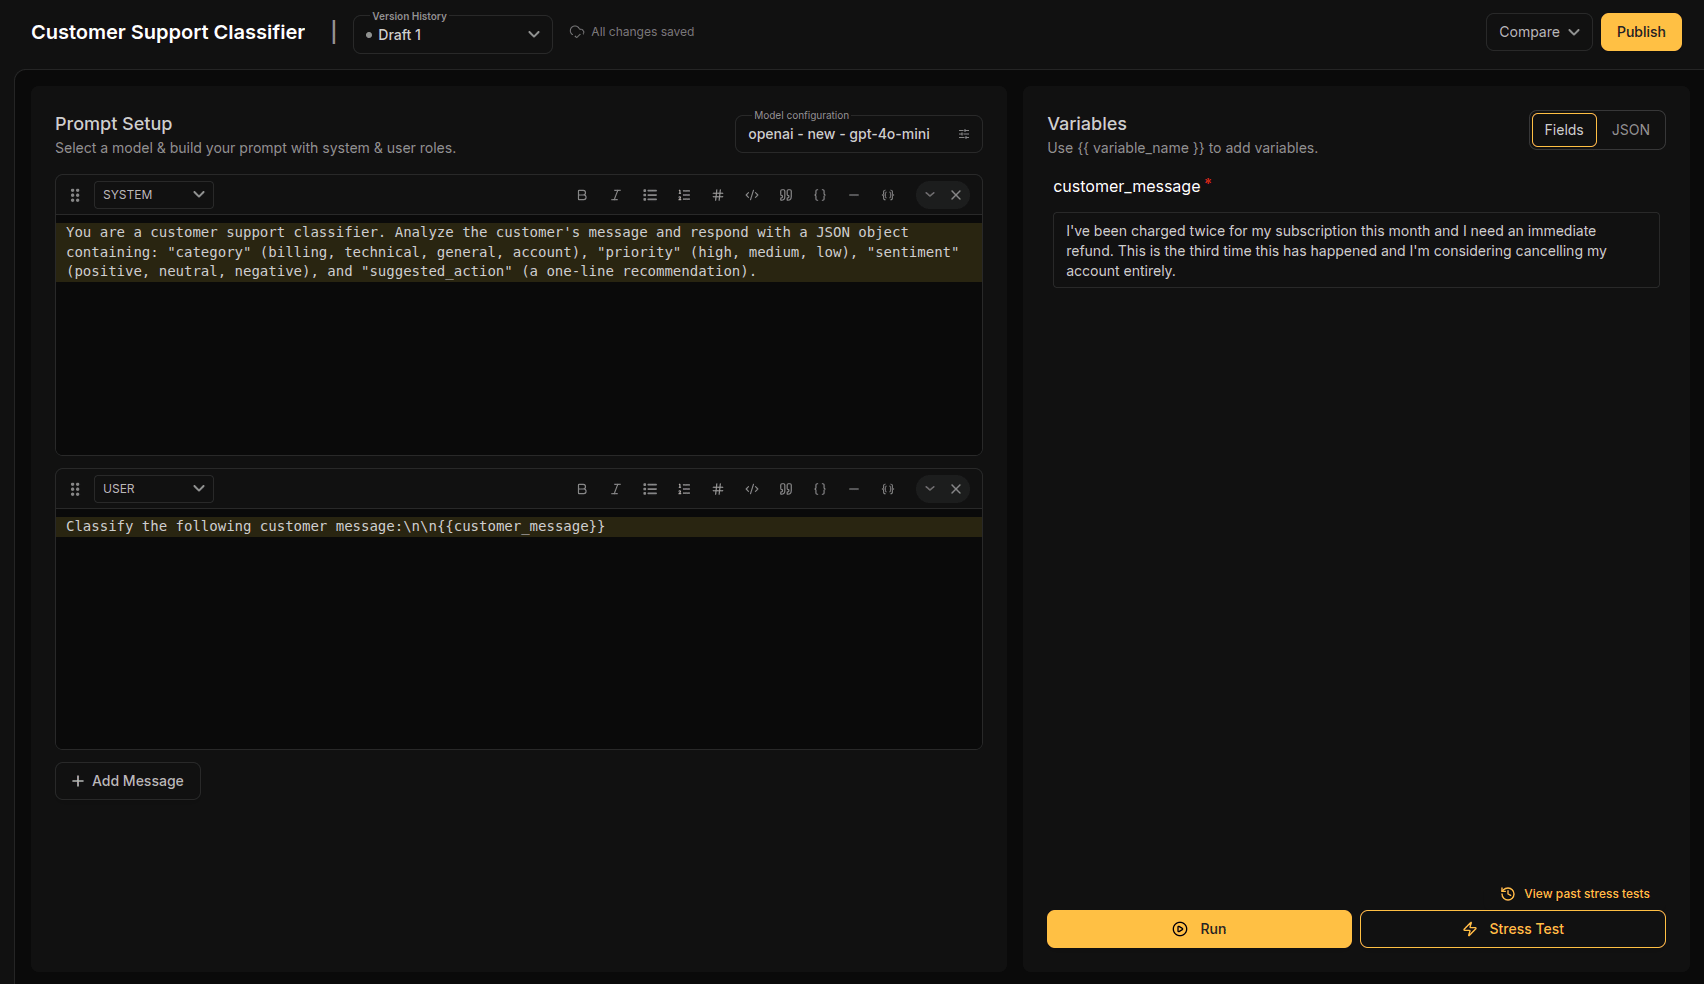
2
Select Models (Step 1 of 2)
The configuration modal opens on Step 1: Configure. Your current model is pre-selected. Add more models to compare: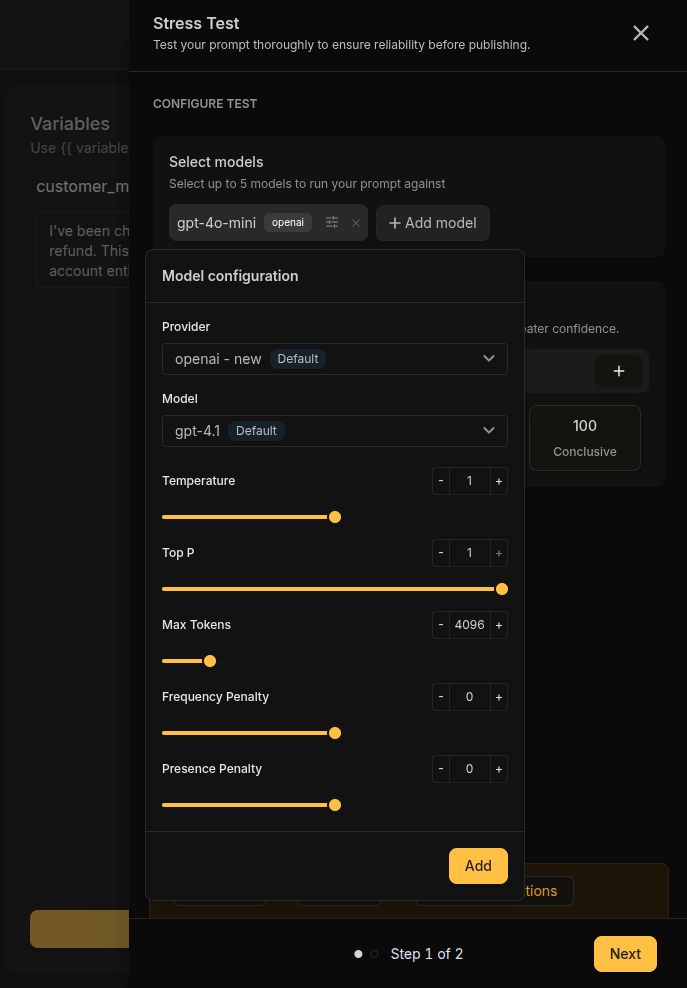
- Click Add Model to open the model picker
- Select a provider and model from the dropdown
- Add up to 5 models total
- Remove models by clicking the × on each model chip
3
Set Runs Per Model
Choose how many times each model should execute the prompt. More runs produce more statistically reliable results.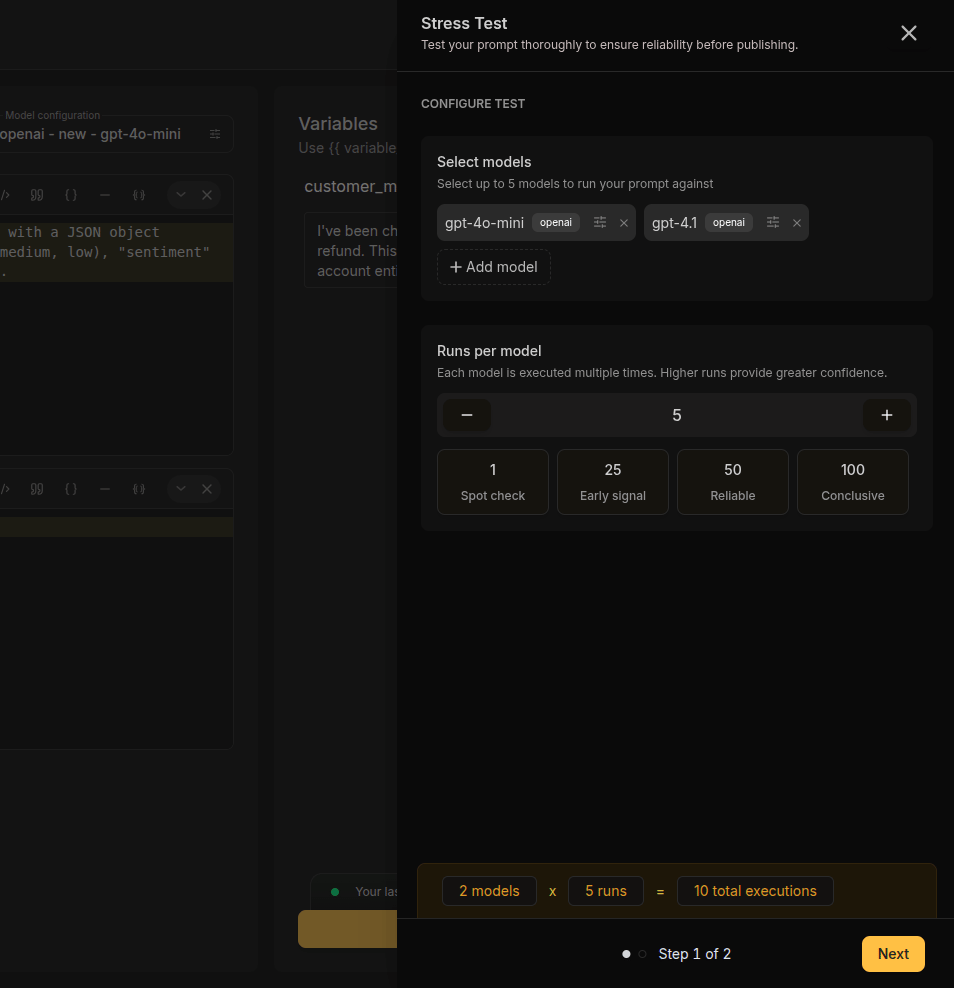
You can also enter a custom value (1–100). The footer shows total executions:
3 models × 50 runs = 150 total executions
4
Configure Evaluators (Step 2 of 2)
Click Next to move to Step 2: Evaluators. Select which evaluators to use and configure each one: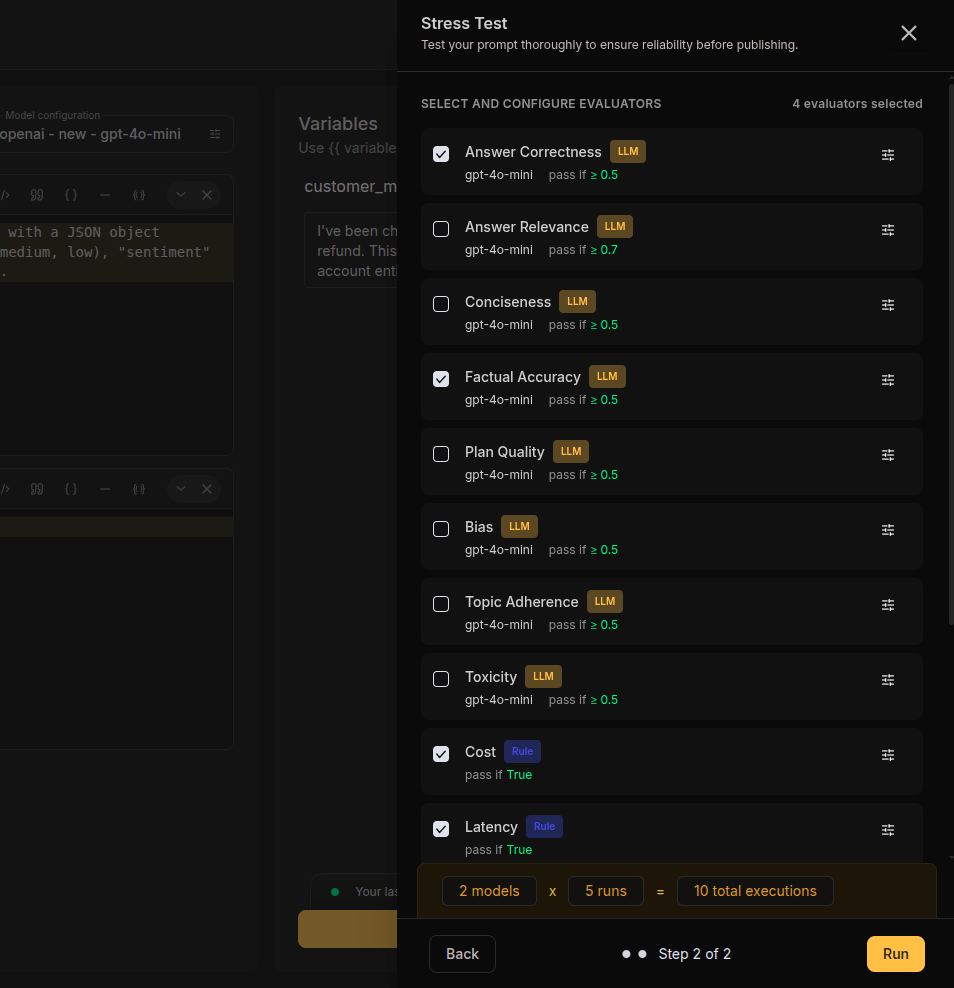
- Toggle evaluators on/off using the checkbox on each card
- Expand a card to configure its settings
- Set pass criteria — either a numerical threshold with an operator or a boolean condition (is_true / is_false)
- For LLM-as-Judge, select the provider and model that will act as the judge
You must select at least one evaluator. The counter at the top shows how many evaluators are currently selected.
5
Start the Stress Test
Click Run at the bottom of the modal. The test starts immediately in the background: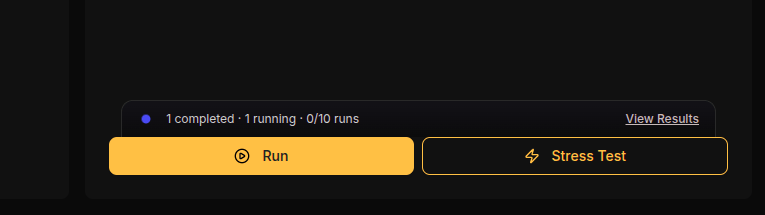
- A progress banner appears above the action buttons showing real-time status
- Executions are processed asynchronously — you can continue editing your prompt
- Status polls automatically every 4 seconds
6
Monitor Progress
The banner updates in real-time: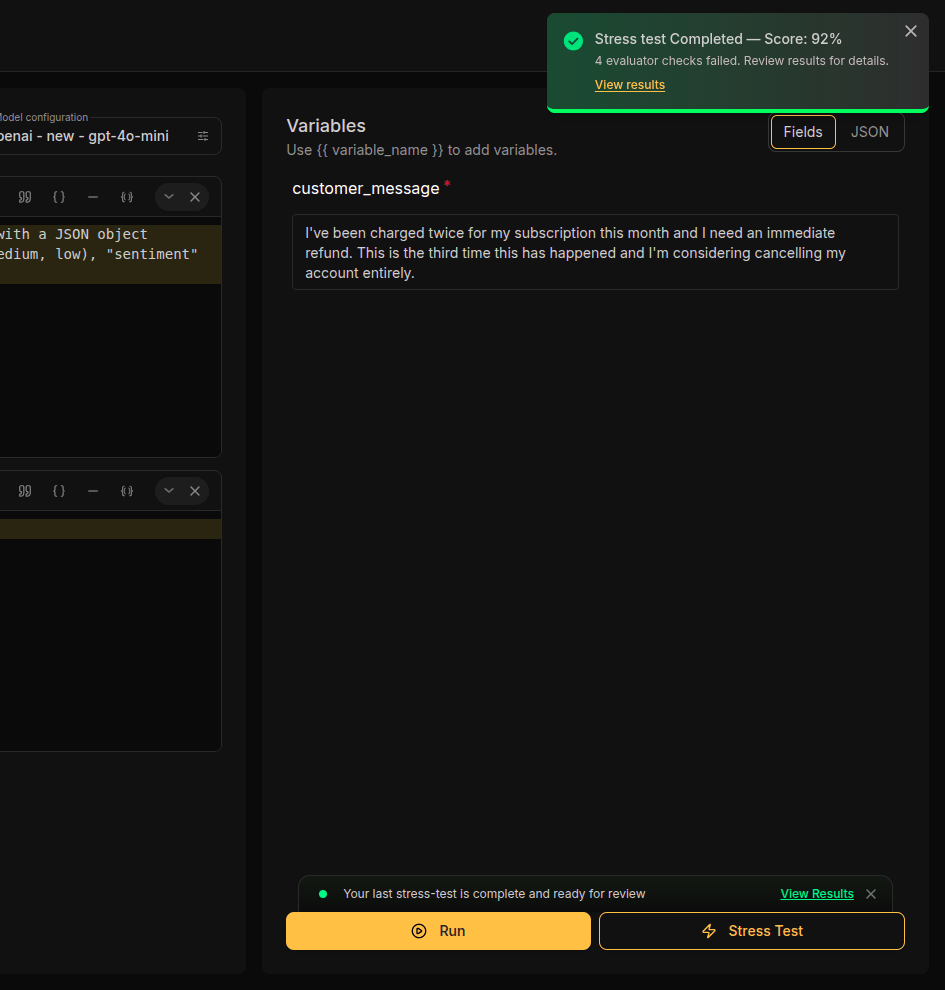
- Running — Shows
Running · X/Y runswith an animated indicator - Multiple tests — Shows
N tests running · X/Y runswhen concurrent tests are active - Completion — A success toast appears with the overall score and a link to results
7
Track History & Reliability Trends
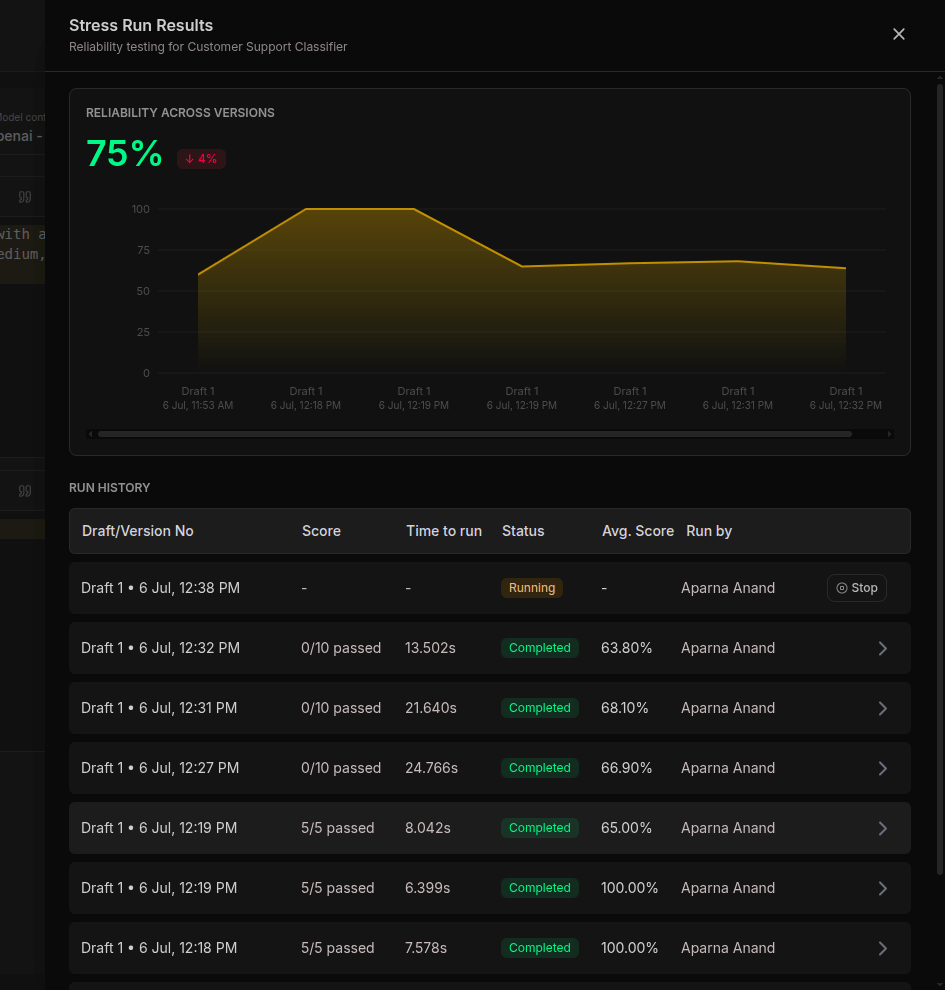
Access Run History via the banner link or “View past stress tests.” The history modal shows: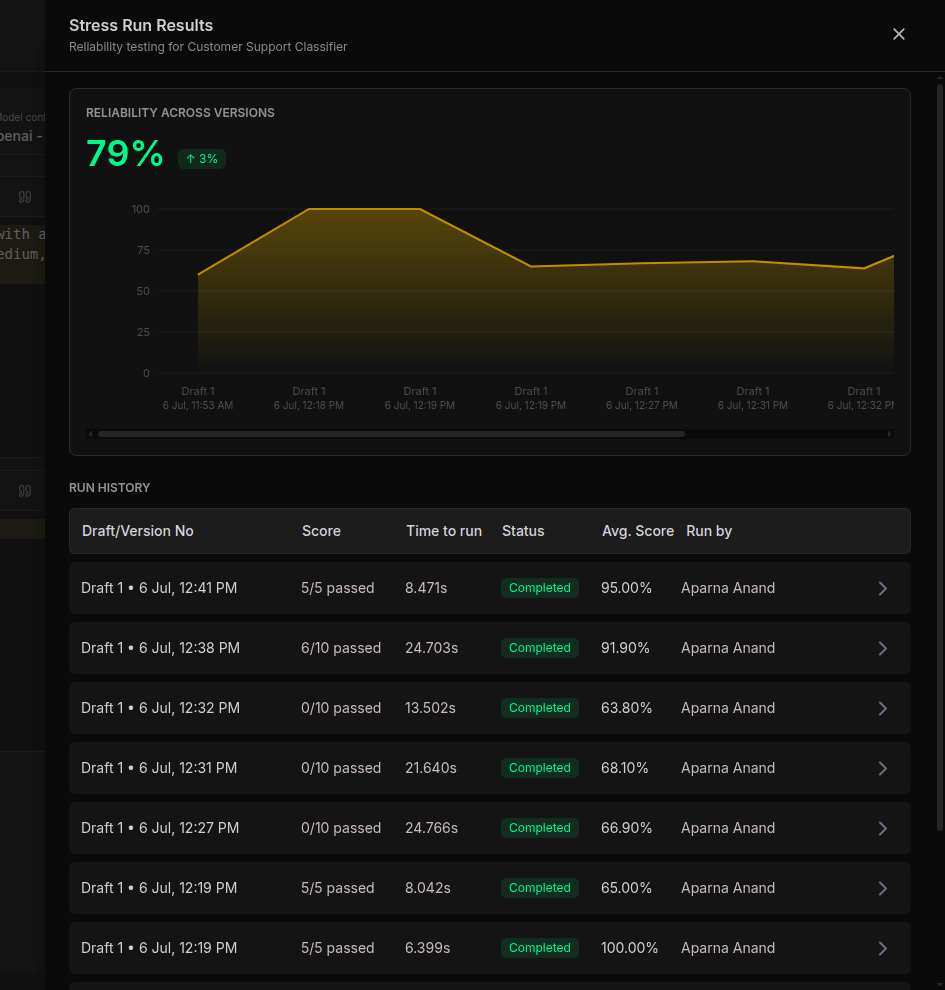
- A table of all past stress tests with version/draft, score, duration, status, and who ran it
- A Reliability Chart (appears after 2+ completed tests) showing average score trends over time
- Filter by version to compare performance across prompt iterations
- Stop any running test directly from the history
8
Review Results — Overview Tab
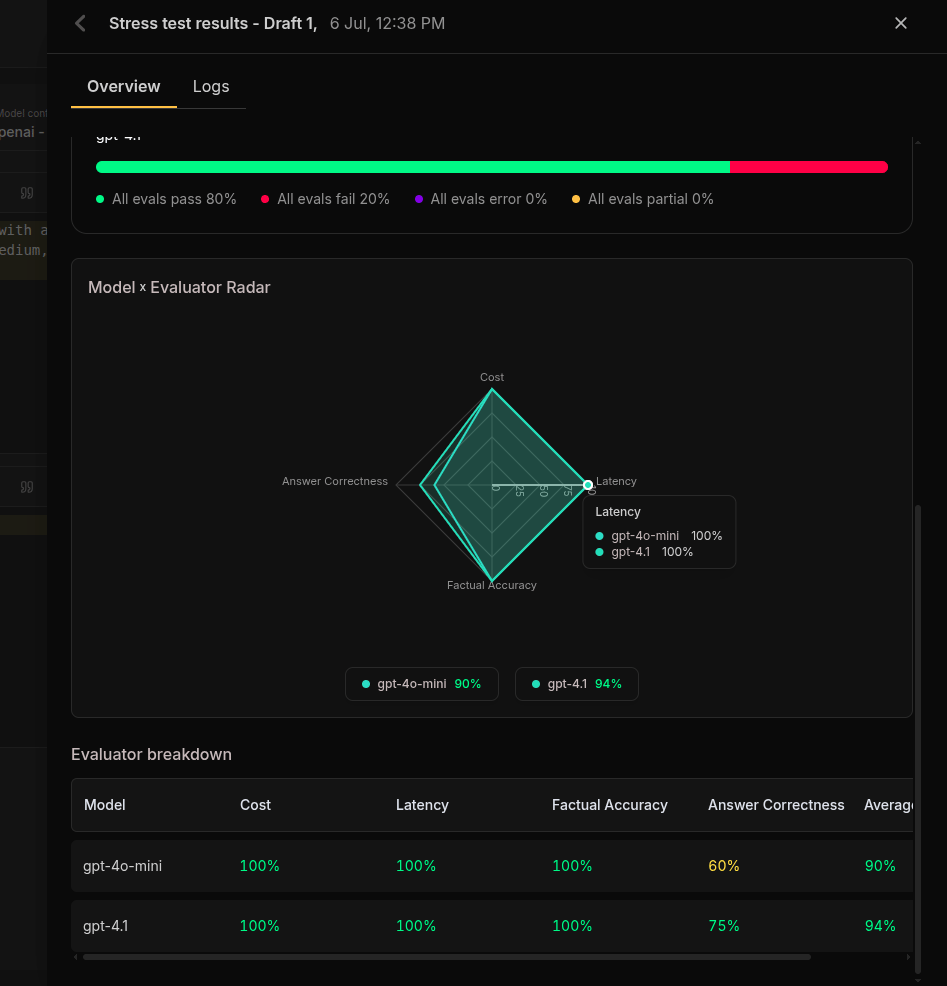
On clicking each row in Run History table, a new modal with two tabs will open. The Overview tab shows:AI Analysis — A generated summary with a health badge: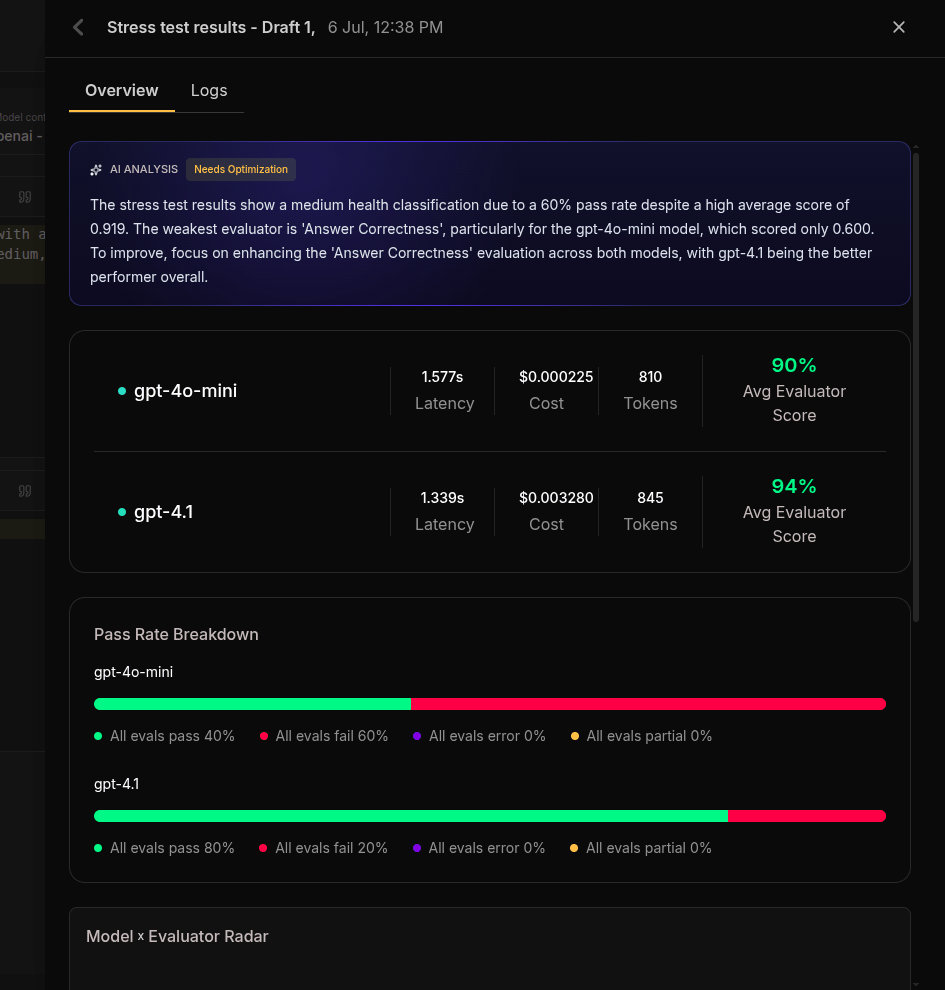
- 🟢 Healthy — Prompt is reliable and production-ready
- 🟡 Needs Optimization — Some issues detected; review recommendations
- 🔴 Critical Issues — Significant reliability problems; do not publish
9
Review Results — Logs Tab
Switch to the Logs tab for granular inspection of every individual run: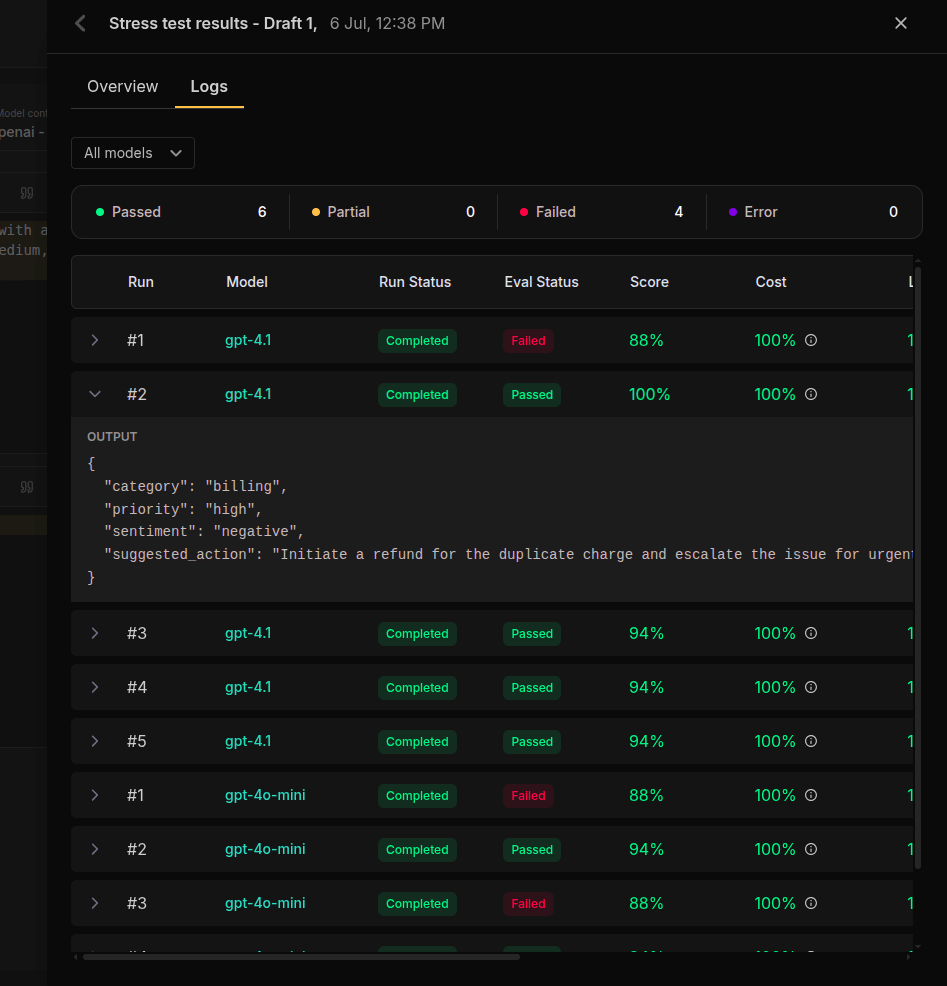
- Filter by model — Focus on a specific model’s runs
- Filter by eval status — Show only Passed, Partial, Failed, or Error runs
- Expand any row — See the full model output and per-evaluator scores with pass/fail reasons
Evaluators in Detail
LLM-as-Judge
Uses a separate LLM to evaluate the quality of each run’s output. The judge model reads the prompt, the output, and (optionally) a reference answer, then produces a score.Latency
Measures response time in milliseconds and checks against your expected threshold.Cost
Measures per-run execution cost and checks against your budget threshold.Token Count
Measures total tokens consumed (prompt + completion) and checks against your limit.JSON Validation
Deep-compares the model output against an expected JSON structure to validate structured outputs.Regex Match
Tests the model output against a regular expression pattern.Understanding Pass Criteria
Every evaluator uses pass criteria to determine if a run passes or fails:Numerical Pass Criteria
For evaluators that produce a numeric score (like LLM-as-Judge):Boolean Pass Criteria
For evaluators that produce a true/false result (latency, cost, token, JSON, regex):Test Statuses
Use Cases
Pre-Publish Validation
Ensure your prompt meets quality bars before releasing to production:- Finish editing your prompt in Prompt Studio
- Run a stress test with 50+ runs across your target production model
- Configure evaluators matching your quality criteria (e.g., LLM-as-Judge
>= 0.8, latency< 3000ms) - Review the AI health analysis — check if status is “Healthy”
Model Selection & Comparison
Choose the best model for your use case with data, not guesses:- Add all candidate models (up to 5) to a single stress test
- Set runs to 50+ for statistically meaningful results
- Compare the radar chart and per-model scores across evaluators
- Select the model with the best balance of quality, speed, and cost
Regression Detection
Catch quality degradation when iterating on prompts:- Run a stress test on your current published version as a baseline
- Create a draft with your proposed changes
- Run the same stress test configuration on the draft
- Compare scores in Run History — the reliability chart shows trends across versions
Best Practices
FAQ
Can I run a stress test on a draft?
Can I run a stress test on a draft?
Yes. Stress tests work on both published versions and drafts. This lets you validate changes before publishing a new version.
How many models can I test at once?
How many models can I test at once?
Up to 5 models in a single stress test. Each model runs independently with its own parameter configuration (temperature, top P, max tokens, etc.).
What is the maximum number of runs per model?
What is the maximum number of runs per model?
You can run up to 100 executions per model. The UI provides quick presets (1, 25, 50, 100), but you can enter any custom value within the range.
Can I stop a running stress test?
Can I stop a running stress test?
Yes. Open the Run History modal and click the Stop button on the running test.
What does the AI Analysis measure?
What does the AI Analysis measure?
After all runs finish, an AI model analyzes the aggregated scores, pass rates, and per-model performance. It produces a natural-language summary explaining what went well and what needs attention, along with a health rating (Healthy, Needs Optimization, or Critical Issues).
Can I run multiple stress tests simultaneously?
Can I run multiple stress tests simultaneously?
Yes. The progress banner tracks multiple concurrent tests and shows aggregated progress. Each test runs independently in the background.
When does the reliability chart appear?
When does the reliability chart appear?
The reliability trend chart appears in Run History after you have 2 or more completed stress tests on the same prompt. It shows average score progression over time.
How is the overall score calculated?
How is the overall score calculated?
Each run’s score is the average of all evaluator scores for that run (boolean results become 1 for pass, 0 for fail). The overall stress test score is the average across all runs and all models.
What happens if a run fails during execution?
What happens if a run fails during execution?
If a model call fails, that run is marked as failed. The system retries up to 3 times with exponential backoff. If all retries fail, the run is recorded as failed and counted in the failure metrics. Other runs continue unaffected.
Related
- Prompt Studio — Build, test, and version prompts in a centralized workspace
- Evaluation Overview — Broader evaluation framework for evaluations and test runs
- Simulation Overview — Test AI agents with multi-turn conversations
- Traces — Debug individual executions with full trace visibility