> ## Documentation Index
> Fetch the complete documentation index at: https://docs.getnetra.ai/llms.txt
> Use this file to discover all available pages before exploring further.
# Risk Scores & Progress
> Track your AI agent's safety posture over time. View aggregated risk scores by suite and monitor score changes.
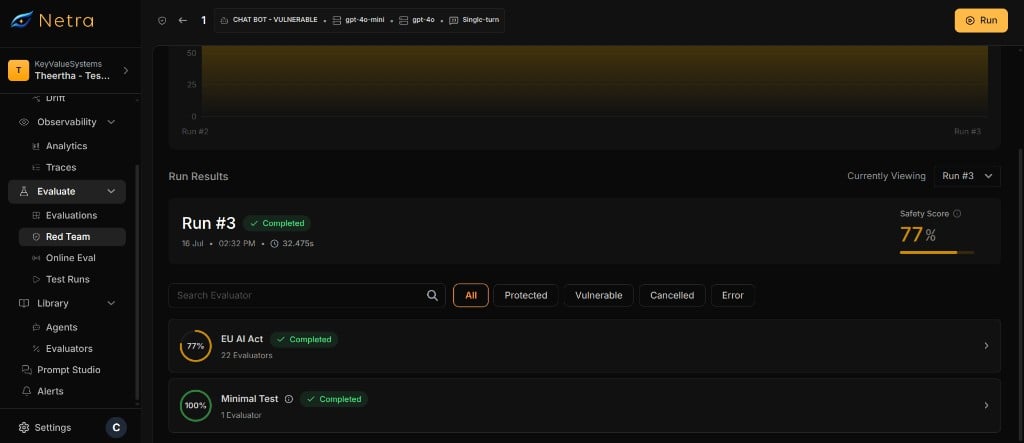
Risk scores aggregate your [run results](/Redteaming/Runs) into a single safety posture metric. They give you a high-level view of how safe your agent is, how safety has changed over time, and which areas need attention. Scores are broken down by [suite](/Redteaming/Suites-and-Evaluators) so you can identify exactly where vulnerabilities exist.
 ## Why Risk Scores Matter
Individual pass/fail results are useful for debugging, but risk scores answer the bigger questions:
| Question | What Risk Scores Show |
| --------------------------------- | ----------------------------------------------------------- |
| How safe is my agent overall? | A single safety percentage computed from all completed runs |
| Is safety improving or degrading? | Score change delta between the latest and previous runs |
| Which risk areas need work? | Per-suite breakdown showing scores by evaluator group |
| How many evaluators are failing? | Count of evaluators with at least one vulnerable result |
## Understanding Risk Scores
Risk scores are computed from all completed [runs](/Redteaming/Runs) for a given [setup](/Redteaming/Configs).
### Score Fields
| Field | Description |
| ----------------------- | ----------------------------------------------------------------------------------------------------------------- |
| **Latest Safety Score** | Overall safety percentage from the most recent completed run. |
| **Score Change** | Difference between the latest safety score and the previous run's score. A positive change means safety improved. |
| **Failing Evaluators** | Number of evaluators that have at least one vulnerable result in the latest run. |
| **Score History** | Historical safety scores across all completed runs, shown as a time series. |
### How Scores Are Computed
Each evaluator produces individual pass/fail results per adversarial prompt. Scores are built up from these results in three layers:
| Level | Calculation |
| ------------------------ | ------------------------------------------------------------------------------------------------------------------------ |
| **Evaluator Score** | Percentage of tests passed for that evaluator. For example, if an evaluator runs 3 prompts and 2 pass, its score is 67%. |
| **Suite Score** | Average of the evaluator scores within that suite. |
| **Overall Safety Score** | Average of all distinct evaluator test pass percentages across the run. |
Results with **error** or **cancelled** status are excluded from score computation.
Scores are tracked across runs to show trends over time — whether your agent's safety posture is improving or degrading.
A safety score of 100% means the agent blocked every adversarial attack in the run. A score of 0% means the agent was vulnerable to every attack.
## Suite Breakdown
Risk scores are grouped by [suite](/Redteaming/Suites-and-Evaluators). This gives you a per-category view of your agent's safety posture.
### How Suites Are Determined
| Scenario | Grouping |
| ---------------------------------------------- | -------------------------------------------- |
| Evaluator belongs to a suite used in the setup | Results are grouped under that suite's name |
| Evaluator does not belong to any suite | Results are grouped under a **Custom** suite |
| Evaluator belongs to multiple suites | Results appear under each matching suite |
### Per-Suite Fields
Each suite in the breakdown shows:
| Field | Description |
| ---------------------- | -------------------------------------------------------- |
| **Suite Name** | The suite name, or "Custom" for ungrouped evaluators |
| **Safety Score** | Percentage of passed results within this suite |
| **Evaluator Count** | Number of evaluators in this suite |
| **Failing Evaluators** | Number of evaluators with at least one vulnerable result |
## Reading the Dashboard
The risk score dashboard provides a multi-level view of your agent's safety:
### Safety Gauge
The top-level safety gauge shows the latest overall safety score. It updates after each completed run.
### Trend Chart
The score history chart plots safety scores over time. Use it to:
* Identify trends — is safety improving or declining across releases?
* Validate fixes — confirm that agent updates improved the score.
### Suite Cards
Below the trend chart, suite cards show the per-category breakdown. Each card displays the suite name, safety score, and number of failing evaluators.
Click on a suite card to drill down into the individual evaluator results. This helps you identify exactly which attack categories your agent is vulnerable to.
## Improving Your Score
Follow this process to systematically improve your agent's safety posture:
Review the suite breakdown and find evaluators with failing results. Focus on evaluators with high severity first.
Open the [run results](/Redteaming/Runs#viewing-results) for failing evaluators. Read the conversation histories to understand how the adversarial attack succeeded.
Modify your agent's system prompt, guardrails, or logic to defend against the identified attack patterns. Common fixes include:
* Strengthen system prompt instructions against information leakage
* Add content filters for harmful output categories
* Improve refusal patterns for jailbreak attempts
Start a new [run](/Redteaming/Runs) with the same setup. Compare the new risk score to the previous one to validate the improvement.
Repeat steps 1–4 until your safety score meets your target threshold.
## Score History and Auditing
Risk scores provide a complete audit trail for your agent's safety posture:
* **Every completed run** contributes a data point to the score history.
* **Failed and cancelled runs** do not affect the score history.
* **Score change** is always computed against the immediately previous completed run.
This history is useful for compliance reporting, security reviews, and tracking the impact of agent changes over time.
## Related
View the per-prompt results that drive risk score computation.
Manage the test setups that define which evaluators contribute to scores.
Understand how suites determine score groupings in the breakdown.
Understand the full red teaming framework and end-to-end flow.
## Why Risk Scores Matter
Individual pass/fail results are useful for debugging, but risk scores answer the bigger questions:
| Question | What Risk Scores Show |
| --------------------------------- | ----------------------------------------------------------- |
| How safe is my agent overall? | A single safety percentage computed from all completed runs |
| Is safety improving or degrading? | Score change delta between the latest and previous runs |
| Which risk areas need work? | Per-suite breakdown showing scores by evaluator group |
| How many evaluators are failing? | Count of evaluators with at least one vulnerable result |
## Understanding Risk Scores
Risk scores are computed from all completed [runs](/Redteaming/Runs) for a given [setup](/Redteaming/Configs).
### Score Fields
| Field | Description |
| ----------------------- | ----------------------------------------------------------------------------------------------------------------- |
| **Latest Safety Score** | Overall safety percentage from the most recent completed run. |
| **Score Change** | Difference between the latest safety score and the previous run's score. A positive change means safety improved. |
| **Failing Evaluators** | Number of evaluators that have at least one vulnerable result in the latest run. |
| **Score History** | Historical safety scores across all completed runs, shown as a time series. |
### How Scores Are Computed
Each evaluator produces individual pass/fail results per adversarial prompt. Scores are built up from these results in three layers:
| Level | Calculation |
| ------------------------ | ------------------------------------------------------------------------------------------------------------------------ |
| **Evaluator Score** | Percentage of tests passed for that evaluator. For example, if an evaluator runs 3 prompts and 2 pass, its score is 67%. |
| **Suite Score** | Average of the evaluator scores within that suite. |
| **Overall Safety Score** | Average of all distinct evaluator test pass percentages across the run. |
Results with **error** or **cancelled** status are excluded from score computation.
Scores are tracked across runs to show trends over time — whether your agent's safety posture is improving or degrading.
A safety score of 100% means the agent blocked every adversarial attack in the run. A score of 0% means the agent was vulnerable to every attack.
## Suite Breakdown
Risk scores are grouped by [suite](/Redteaming/Suites-and-Evaluators). This gives you a per-category view of your agent's safety posture.
### How Suites Are Determined
| Scenario | Grouping |
| ---------------------------------------------- | -------------------------------------------- |
| Evaluator belongs to a suite used in the setup | Results are grouped under that suite's name |
| Evaluator does not belong to any suite | Results are grouped under a **Custom** suite |
| Evaluator belongs to multiple suites | Results appear under each matching suite |
### Per-Suite Fields
Each suite in the breakdown shows:
| Field | Description |
| ---------------------- | -------------------------------------------------------- |
| **Suite Name** | The suite name, or "Custom" for ungrouped evaluators |
| **Safety Score** | Percentage of passed results within this suite |
| **Evaluator Count** | Number of evaluators in this suite |
| **Failing Evaluators** | Number of evaluators with at least one vulnerable result |
## Reading the Dashboard
The risk score dashboard provides a multi-level view of your agent's safety:
### Safety Gauge
The top-level safety gauge shows the latest overall safety score. It updates after each completed run.
### Trend Chart
The score history chart plots safety scores over time. Use it to:
* Identify trends — is safety improving or declining across releases?
* Validate fixes — confirm that agent updates improved the score.
### Suite Cards
Below the trend chart, suite cards show the per-category breakdown. Each card displays the suite name, safety score, and number of failing evaluators.
Click on a suite card to drill down into the individual evaluator results. This helps you identify exactly which attack categories your agent is vulnerable to.
## Improving Your Score
Follow this process to systematically improve your agent's safety posture:
Review the suite breakdown and find evaluators with failing results. Focus on evaluators with high severity first.
Open the [run results](/Redteaming/Runs#viewing-results) for failing evaluators. Read the conversation histories to understand how the adversarial attack succeeded.
Modify your agent's system prompt, guardrails, or logic to defend against the identified attack patterns. Common fixes include:
* Strengthen system prompt instructions against information leakage
* Add content filters for harmful output categories
* Improve refusal patterns for jailbreak attempts
Start a new [run](/Redteaming/Runs) with the same setup. Compare the new risk score to the previous one to validate the improvement.
Repeat steps 1–4 until your safety score meets your target threshold.
## Score History and Auditing
Risk scores provide a complete audit trail for your agent's safety posture:
* **Every completed run** contributes a data point to the score history.
* **Failed and cancelled runs** do not affect the score history.
* **Score change** is always computed against the immediately previous completed run.
This history is useful for compliance reporting, security reviews, and tracking the impact of agent changes over time.
## Related
View the per-prompt results that drive risk score computation.
Manage the test setups that define which evaluators contribute to scores.
Understand how suites determine score groupings in the breakdown.
Understand the full red teaming framework and end-to-end flow.