> ## Documentation Index
> Fetch the complete documentation index at: https://docs.getnetra.ai/llms.txt
> Use this file to discover all available pages before exploring further.
# Evaluations
> Create and manage image evaluations in Netra. Build test cases with image inputs, expected outputs, and metadata to benchmark visual AI systems.
Image evaluations are collections of test cases designed to evaluate image generation, editing, and analysis systems. They define the visual inputs, expected outputs, and metadata that [Image Evaluators](/Evaluators/image-evaluators) use to score your AI's performance. Create them manually or import from CSV for comprehensive visual quality coverage.
## Why Image Evaluations Matter
Image evaluations transform ad-hoc visual testing into systematic quality assurance:
| Benefit | Description |
| -------------------------- | -------------------------------------------------------------------------- |
| **Reproducibility** | Run the same visual tests across model updates and prompt changes |
| **Regression Detection** | Compare visual quality over time to catch degradation early |
| **Objective Benchmarking** | Measure image quality against defined criteria, not subjective impressions |
| **URL-based Inputs** | All images referenced via URLs in metadata fields |
## Image Evaluation Dashboard
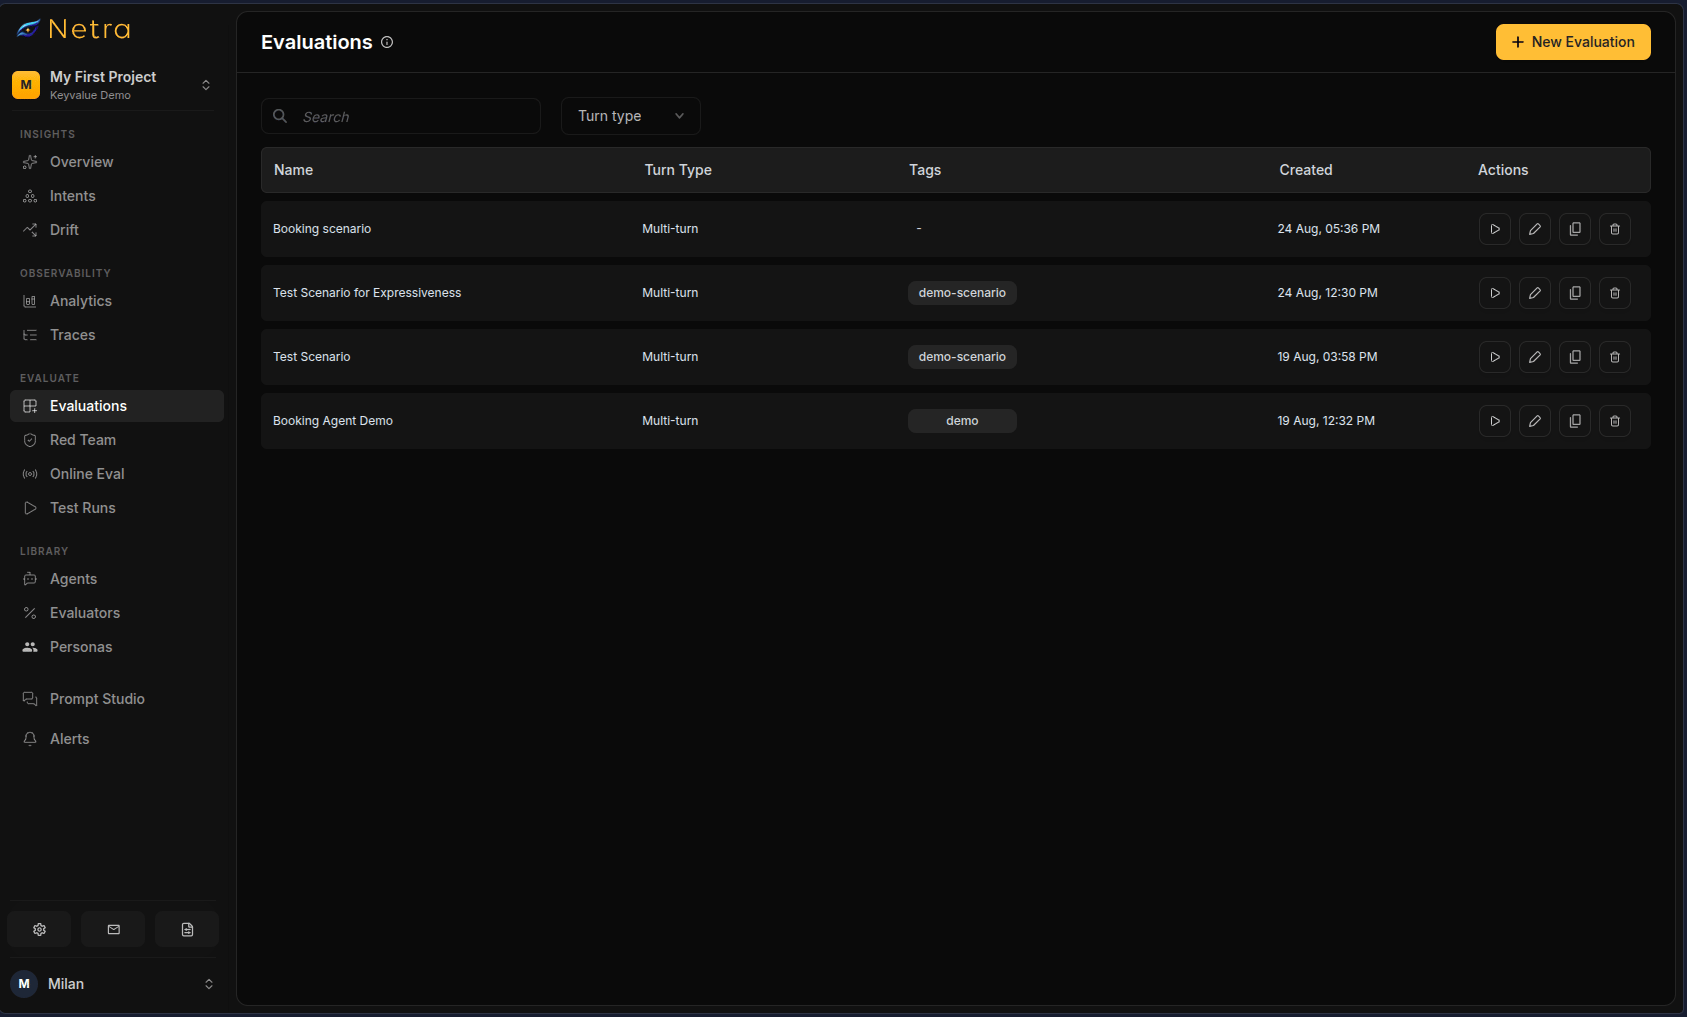
Navigate to **Evaluate → Evaluations** from the left navigation panel to access your evaluations.
| Column | Description |
| ------------------- | ---------------------------------------------- |
| **Evaluation Name** | Unique identifier for the image test suite |
| **Tags** | Metadata labels for filtering and organization |
| **Created At** | Timestamp for version tracking |
| **Actions** | Quick access to edit or delete evaluations |
 ## Creating an Image Evaluation
Click **New Evaluation** in the top right corner of the Evaluations page.
Build image test suites from scratch, one test case at a time
Import a spreadsheet of image test cases in bulk
Generate test cases using AI based on your description
### Configure Basics
Both creation methods start with the same configuration:
| Field | Description |
| ------------------- | ------------------------------------------------------------------------------ |
| **Name** | A descriptive identifier for your image test suite |
| **Tags** | Labels for filtering (e.g., "image-generation", "quality-testing", "v2-model") |
| **Turn Type** | **Single Turn** for image input/output pairs |
| **Data Type** | Select **Image** for image-based evaluations |
| **Creation Method** | **Add manually** or **Upload CSV** |
Multi-turn image scenarios are not currently supported. Image evaluations use single-turn test cases.
### Creating Items Manually
Click the **New Evaluation** button and select **Image** as the data type.
For each test case, provide:
| Field | Required | Description |
| ------------ | -------- | ---------------------------------------------------------------------------------------- |
| **Input** | Yes | Text prompt describing what to generate or edit (e.g., "A red sports car in a showroom") |
| **Metadata** | No | Image URLs and expected properties (see [Metadata Fields](#metadata-fields) below) |
**Example metadata for text-to-image generation:**
```json theme={null}
{
"reference_images": ["https://example.com/reference1.jpg"],
"text_caption": "A photorealistic portrait with natural lighting",
"expected_dimensions": "1024x1024",
"expected_format": "PNG"
}
```
**Example metadata for image editing:**
```json theme={null}
{
"input_image": "https://example.com/original.jpg",
"input_edit_instruction": "Remove the background"
}
```
Click **Next** and select [image evaluators](/Evaluators/image-evaluators) from the library or your saved configurations. Choose evaluators appropriate for your visual quality criteria.
Configure variable mappings to connect evaluator inputs to your image data:
| Source | Use Case |
| ------------------- | --------------------------------------------------------------------------- |
| **Input** | Text prompt describing what to generate or edit |
| **Task Output** | Generated or edited image URL (returned by your task function) |
| **Metadata Fields** | Image URLs and expected properties (reference\_images, text\_caption, etc.) |
| **Value** | Fixed literal values for comparison |
Click **Create Evaluation** to complete the process.
### Uploading a CSV
For bulk creation, prepare a CSV with columns for input, expected output, and optional metadata.
```csv theme={null}
input,expected_output,metadata
"A photorealistic portrait with natural lighting","","{""reference_images"":[""https://example.com/ref1.jpg""],""expected_dimensions"":""1024x1024""}"
"Remove the background from this product photo","","{""input_image"":""https://example.com/product.jpg"",""input_edit_instruction"":""Remove background""}"
```
Choose **Upload CSV** as the creation method and select your file. A sample template is available for download.
Assign each CSV column to a target field—**input**, **expected\_output**, **metadata**—or skip it.
Row-level errors are flagged before import. Common issues include invalid image URLs in metadata, unsupported formats, or malformed metadata JSON. Fix any issues and re-upload if needed.
Continue through evaluator selection and variable mapping as with manual creation.
### Metadata Fields
Image evaluations use metadata fields to store image URLs and expected properties. These fields map to [image evaluator](/Evaluators/image-evaluators) variables:
| Metadata Field | Description | Example Value |
| ------------------------ | ------------------------------------------------------------ | ------------------------------------ |
| `reference_images` | Array of reference image URLs for comparison | `["https://example.com/ref.jpg"]` |
| `text_caption` | Description of the image for text-image alignment evaluation | `"A sunset over mountains"` |
| `expected_dimensions` | Expected pixel dimensions in WxH format | `"1024x1024"` |
| `expected_aspect_ratio` | Expected aspect ratio in W:H format | `"16:9"` |
| `expected_format` | Expected image file format | `"PNG"` |
| `expected_max_file_size` | Maximum allowed file size with unit | `"2MB"` |
| `input_image` | URL of the original image (for editing tasks) | `"https://example.com/original.jpg"` |
| `input_edit_instruction` | Editing instruction applied to the image | `"Remove the background"` |
The `output_image` variable is automatically populated from your task function's return value. You do not need to include it in metadata.
## Managing an Image Evaluation
Open any evaluation to manage it. The detail page has three tabs:
| Tab | Description |
| ------------- | -------------------------------------------------------------------------------------------------------- |
| **Details** | Browse and edit image test cases; preview images inline |
| **Analytics** | Embedded evaluation analytics—overall health, average score over time, and per-evaluator pass/fail rates |
| **Test Runs** | Runs triggered from this evaluation, with a **Run Test Suite** action |
From the detail page you can also:
* **Preview images** directly in the test case list
* **Clone** the evaluation or individual test cases to create variants
* **Bulk edit** items across the evaluation
* **Manage default evaluators** — add evaluators that apply to all items, or override them for specific items
## Running an Image Evaluation
Once your evaluation is configured with evaluators, trigger a test run via the SDK.
Open your evaluation and copy the **Evaluation ID** displayed at the top of the page.
Use the Evaluation ID to fetch the evaluation and run a test suite. The task function receives the image input from each evaluation item and should return the generated output.
```python Python theme={null}
from netra import Netra
Netra.init(app_name="my-app")
def my_image_task(input_data):
# Your AI logic — generates/edits image based on input_data text prompt
# and returns the image URL (must be publicly accessible)
return generated_image_url
dataset = Netra.evaluation.get_dataset(dataset_id="your-dataset-id")
result = Netra.evaluation.run_test_suite(
name="Image Evaluation",
data=dataset,
task=my_image_task,
)
```
```typescript TypeScript theme={null}
import { Netra } from "netra-sdk";
await Netra.init({ appName: "my-app" });
async function myImageTask(inputData: string): Promise {
// Your AI logic — generates/edits image based on inputData text prompt
// and returns the image URL (must be publicly accessible)
return generatedImageUrl;
}
const dataset = await Netra.evaluation.getDataset("your-dataset-id");
const result = await Netra.evaluation.runTestSuite(
"Image Evaluation",
dataset,
myImageTask,
);
```
The returned image URL is compared against metadata fields by the [evaluators](/Evaluators/image-evaluators) attached to the evaluation. See the SDK reference for [Python](/sdk-reference/evaluation/python) and [TypeScript](/sdk-reference/evaluation/typescript) for the full API.
Monitor progress and results in [Image Test Runs](/Evaluations/TestRuns).
## Best Practices
### Organizing Image Evaluations
* **Use descriptive names**: "Product Photos - Lighting Variants" is better than "Image Evaluation 1"
* **Tag by use case**: Create tags for different evaluation scenarios (e.g., "portrait", "landscape", "product")
* **Version your evaluations**: Include version numbers in tags when testing model iterations
### Building Effective Image Test Cases
* **Cover diverse scenarios**: Include various image types, styles, and complexity levels
* **Include edge cases**: Low resolution, unusual formats, complex compositions
* **Balance quantity and quality**: A smaller evaluation of diverse, high-quality test cases beats a large evaluation of similar images
* **Add negative tests**: Include cases where the expected behavior is to reject or fail gracefully
### Maintaining Image Evaluations
* **Update regularly**: Add new test cases as you discover new patterns
* **Remove outdated cases**: Delete test cases that no longer reflect current requirements
* **Review failed cases**: Investigate failures to determine if the AI is wrong or the expected output needs updating
* **Clone before major changes**: Duplicate an evaluation when testing significant model or prompt revisions
## Related
* [Evaluation Overview](/Evaluations/Evaluation-overview) - Understand the full evaluation framework
* [Image Evaluators](/Evaluators/image-evaluators) - Configure scoring logic for image evaluations
* [Image Test Runs](/Evaluations/TestRuns) - Analyze image evaluation results
* [Text Evaluations](/Evaluations/text-evaluations/Datasets) - Compare with text-based evaluation evaluations
## Creating an Image Evaluation
Click **New Evaluation** in the top right corner of the Evaluations page.
Build image test suites from scratch, one test case at a time
Import a spreadsheet of image test cases in bulk
Generate test cases using AI based on your description
### Configure Basics
Both creation methods start with the same configuration:
| Field | Description |
| ------------------- | ------------------------------------------------------------------------------ |
| **Name** | A descriptive identifier for your image test suite |
| **Tags** | Labels for filtering (e.g., "image-generation", "quality-testing", "v2-model") |
| **Turn Type** | **Single Turn** for image input/output pairs |
| **Data Type** | Select **Image** for image-based evaluations |
| **Creation Method** | **Add manually** or **Upload CSV** |
Multi-turn image scenarios are not currently supported. Image evaluations use single-turn test cases.
### Creating Items Manually
Click the **New Evaluation** button and select **Image** as the data type.
For each test case, provide:
| Field | Required | Description |
| ------------ | -------- | ---------------------------------------------------------------------------------------- |
| **Input** | Yes | Text prompt describing what to generate or edit (e.g., "A red sports car in a showroom") |
| **Metadata** | No | Image URLs and expected properties (see [Metadata Fields](#metadata-fields) below) |
**Example metadata for text-to-image generation:**
```json theme={null}
{
"reference_images": ["https://example.com/reference1.jpg"],
"text_caption": "A photorealistic portrait with natural lighting",
"expected_dimensions": "1024x1024",
"expected_format": "PNG"
}
```
**Example metadata for image editing:**
```json theme={null}
{
"input_image": "https://example.com/original.jpg",
"input_edit_instruction": "Remove the background"
}
```
Click **Next** and select [image evaluators](/Evaluators/image-evaluators) from the library or your saved configurations. Choose evaluators appropriate for your visual quality criteria.
Configure variable mappings to connect evaluator inputs to your image data:
| Source | Use Case |
| ------------------- | --------------------------------------------------------------------------- |
| **Input** | Text prompt describing what to generate or edit |
| **Task Output** | Generated or edited image URL (returned by your task function) |
| **Metadata Fields** | Image URLs and expected properties (reference\_images, text\_caption, etc.) |
| **Value** | Fixed literal values for comparison |
Click **Create Evaluation** to complete the process.
### Uploading a CSV
For bulk creation, prepare a CSV with columns for input, expected output, and optional metadata.
```csv theme={null}
input,expected_output,metadata
"A photorealistic portrait with natural lighting","","{""reference_images"":[""https://example.com/ref1.jpg""],""expected_dimensions"":""1024x1024""}"
"Remove the background from this product photo","","{""input_image"":""https://example.com/product.jpg"",""input_edit_instruction"":""Remove background""}"
```
Choose **Upload CSV** as the creation method and select your file. A sample template is available for download.
Assign each CSV column to a target field—**input**, **expected\_output**, **metadata**—or skip it.
Row-level errors are flagged before import. Common issues include invalid image URLs in metadata, unsupported formats, or malformed metadata JSON. Fix any issues and re-upload if needed.
Continue through evaluator selection and variable mapping as with manual creation.
### Metadata Fields
Image evaluations use metadata fields to store image URLs and expected properties. These fields map to [image evaluator](/Evaluators/image-evaluators) variables:
| Metadata Field | Description | Example Value |
| ------------------------ | ------------------------------------------------------------ | ------------------------------------ |
| `reference_images` | Array of reference image URLs for comparison | `["https://example.com/ref.jpg"]` |
| `text_caption` | Description of the image for text-image alignment evaluation | `"A sunset over mountains"` |
| `expected_dimensions` | Expected pixel dimensions in WxH format | `"1024x1024"` |
| `expected_aspect_ratio` | Expected aspect ratio in W:H format | `"16:9"` |
| `expected_format` | Expected image file format | `"PNG"` |
| `expected_max_file_size` | Maximum allowed file size with unit | `"2MB"` |
| `input_image` | URL of the original image (for editing tasks) | `"https://example.com/original.jpg"` |
| `input_edit_instruction` | Editing instruction applied to the image | `"Remove the background"` |
The `output_image` variable is automatically populated from your task function's return value. You do not need to include it in metadata.
## Managing an Image Evaluation
Open any evaluation to manage it. The detail page has three tabs:
| Tab | Description |
| ------------- | -------------------------------------------------------------------------------------------------------- |
| **Details** | Browse and edit image test cases; preview images inline |
| **Analytics** | Embedded evaluation analytics—overall health, average score over time, and per-evaluator pass/fail rates |
| **Test Runs** | Runs triggered from this evaluation, with a **Run Test Suite** action |
From the detail page you can also:
* **Preview images** directly in the test case list
* **Clone** the evaluation or individual test cases to create variants
* **Bulk edit** items across the evaluation
* **Manage default evaluators** — add evaluators that apply to all items, or override them for specific items
## Running an Image Evaluation
Once your evaluation is configured with evaluators, trigger a test run via the SDK.
Open your evaluation and copy the **Evaluation ID** displayed at the top of the page.
Use the Evaluation ID to fetch the evaluation and run a test suite. The task function receives the image input from each evaluation item and should return the generated output.
```python Python theme={null}
from netra import Netra
Netra.init(app_name="my-app")
def my_image_task(input_data):
# Your AI logic — generates/edits image based on input_data text prompt
# and returns the image URL (must be publicly accessible)
return generated_image_url
dataset = Netra.evaluation.get_dataset(dataset_id="your-dataset-id")
result = Netra.evaluation.run_test_suite(
name="Image Evaluation",
data=dataset,
task=my_image_task,
)
```
```typescript TypeScript theme={null}
import { Netra } from "netra-sdk";
await Netra.init({ appName: "my-app" });
async function myImageTask(inputData: string): Promise {
// Your AI logic — generates/edits image based on inputData text prompt
// and returns the image URL (must be publicly accessible)
return generatedImageUrl;
}
const dataset = await Netra.evaluation.getDataset("your-dataset-id");
const result = await Netra.evaluation.runTestSuite(
"Image Evaluation",
dataset,
myImageTask,
);
```
The returned image URL is compared against metadata fields by the [evaluators](/Evaluators/image-evaluators) attached to the evaluation. See the SDK reference for [Python](/sdk-reference/evaluation/python) and [TypeScript](/sdk-reference/evaluation/typescript) for the full API.
Monitor progress and results in [Image Test Runs](/Evaluations/TestRuns).
## Best Practices
### Organizing Image Evaluations
* **Use descriptive names**: "Product Photos - Lighting Variants" is better than "Image Evaluation 1"
* **Tag by use case**: Create tags for different evaluation scenarios (e.g., "portrait", "landscape", "product")
* **Version your evaluations**: Include version numbers in tags when testing model iterations
### Building Effective Image Test Cases
* **Cover diverse scenarios**: Include various image types, styles, and complexity levels
* **Include edge cases**: Low resolution, unusual formats, complex compositions
* **Balance quantity and quality**: A smaller evaluation of diverse, high-quality test cases beats a large evaluation of similar images
* **Add negative tests**: Include cases where the expected behavior is to reject or fail gracefully
### Maintaining Image Evaluations
* **Update regularly**: Add new test cases as you discover new patterns
* **Remove outdated cases**: Delete test cases that no longer reflect current requirements
* **Review failed cases**: Investigate failures to determine if the AI is wrong or the expected output needs updating
* **Clone before major changes**: Duplicate an evaluation when testing significant model or prompt revisions
## Related
* [Evaluation Overview](/Evaluations/Evaluation-overview) - Understand the full evaluation framework
* [Image Evaluators](/Evaluators/image-evaluators) - Configure scoring logic for image evaluations
* [Image Test Runs](/Evaluations/TestRuns) - Analyze image evaluation results
* [Text Evaluations](/Evaluations/text-evaluations/Datasets) - Compare with text-based evaluation evaluations