> ## Documentation Index
> Fetch the complete documentation index at: https://docs.getnetra.ai/llms.txt
> Use this file to discover all available pages before exploring further.
# Agents
> Connect your AI agents to Netra via HTTP and trigger test suite runs directly from the UI. Configure endpoints, test in the playground, and run full dataset evaluations without writing code.
Agents in Netra represent your external AI applications: chatbots, copilots, or any HTTP-accessible endpoint. Connect them once, then trigger automated test suite runs against your [Datasets](/Simulation/Datasets) directly from the UI. No SDK integration required—Netra calls your agent's API, collects responses, and runs [Evaluators](/Simulation/Evaluators) to score every interaction.
## Why Agents Matter
Testing AI agents manually doesn't scale. Connecting your agent to Netra unlocks automated, repeatable evaluation:
| Challenge | How Agents Help |
| -------------------------- | ------------------------------------------------------------------------- |
| Manual testing is slow | Run entire datasets against your agent with a single click |
| Inconsistent test coverage | Every dataset item is tested systematically with the same evaluators |
| No multi-turn testing | Netra simulates realistic users for multi-turn conversation testing |
| Disconnected tracing | Agent responses are automatically traced and linked to evaluation results |
| Environment-specific bugs | Test against staging, production, or any HTTP endpoint |
## How It Works
Netra provides two ways to interact with your connected agent:
Send individual messages to your agent in an interactive chat. Ideal for quick validation while configuring endpoints and response mappings.
Trigger a full dataset evaluation against your agent. Netra fans out every dataset item, collects responses, runs evaluators, and reports results.
## Agents Dashboard
Navigate to **Simulation → Agents** from the left navigation panel. The dashboard displays all configured agents for the current project.
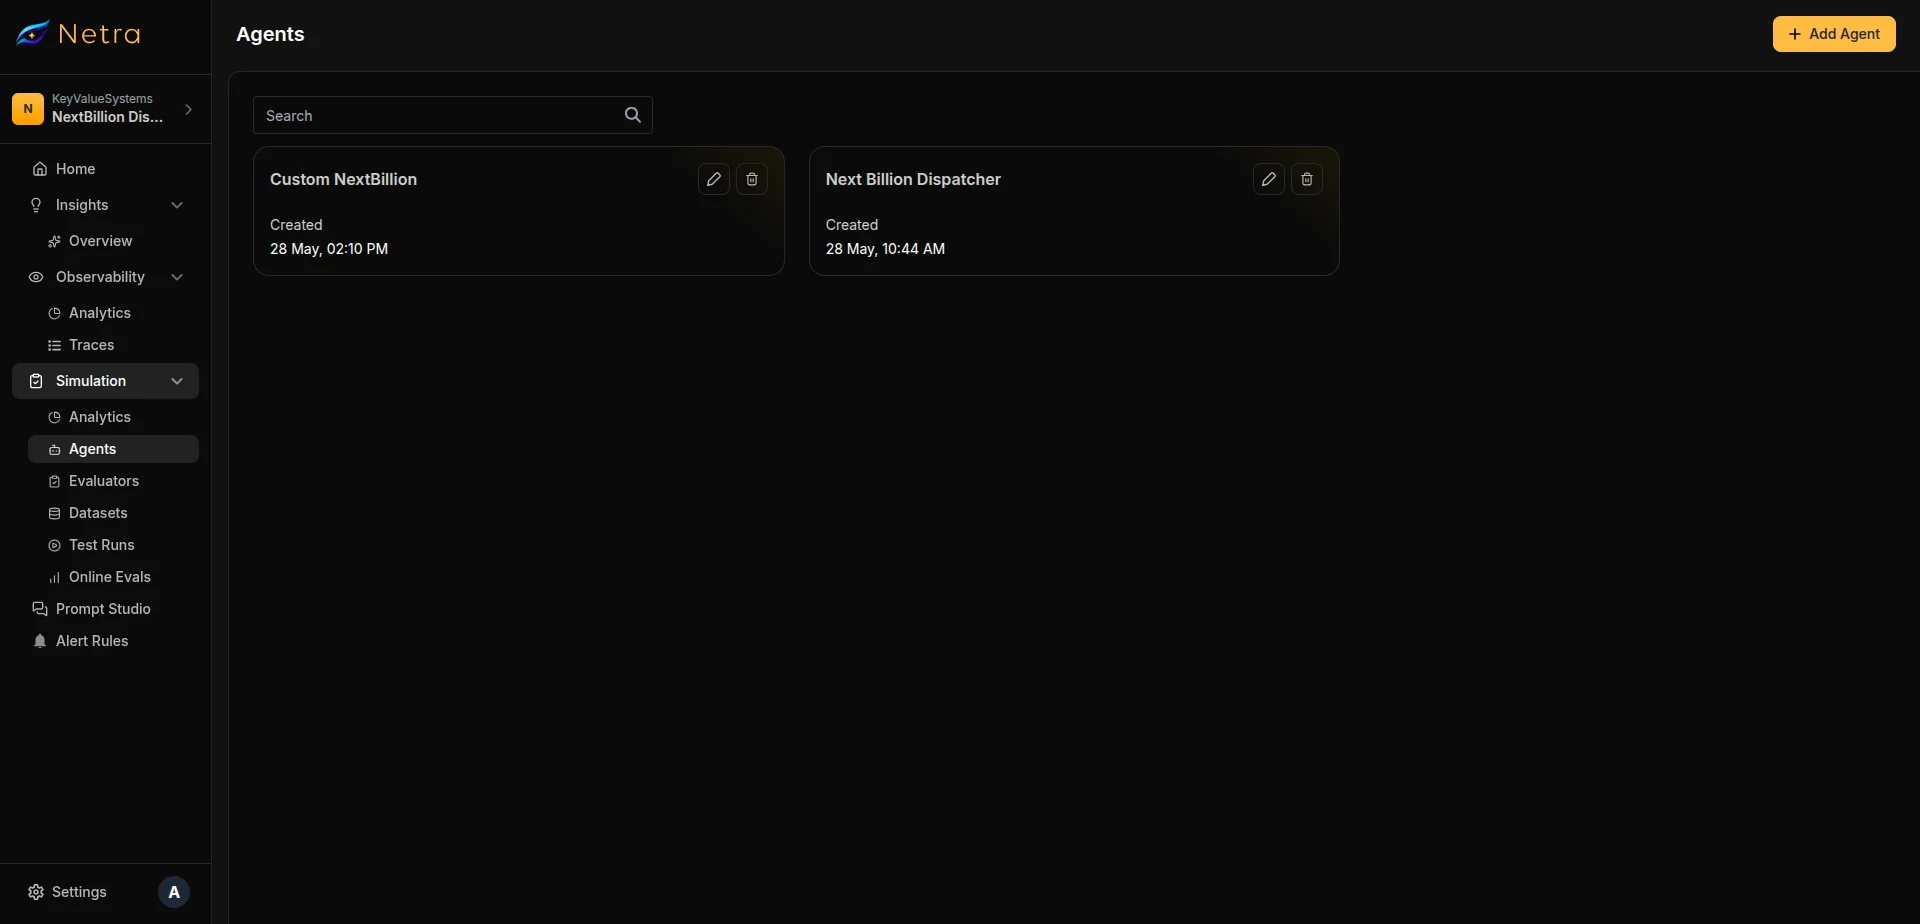 Each agent card shows:
| Field | Description |
| ------------ | ----------------------------- |
| **Name** | Agent display name |
| **Endpoint** | The HTTP method and base URL |
| **Created** | When the agent was configured |
## Configuring an Agent
Click **Add Agent** in the top right corner to configure a new agent connection.
Each agent card shows:
| Field | Description |
| ------------ | ----------------------------- |
| **Name** | Agent display name |
| **Endpoint** | The HTTP method and base URL |
| **Created** | When the agent was configured |
## Configuring an Agent
Click **Add Agent** in the top right corner to configure a new agent connection.
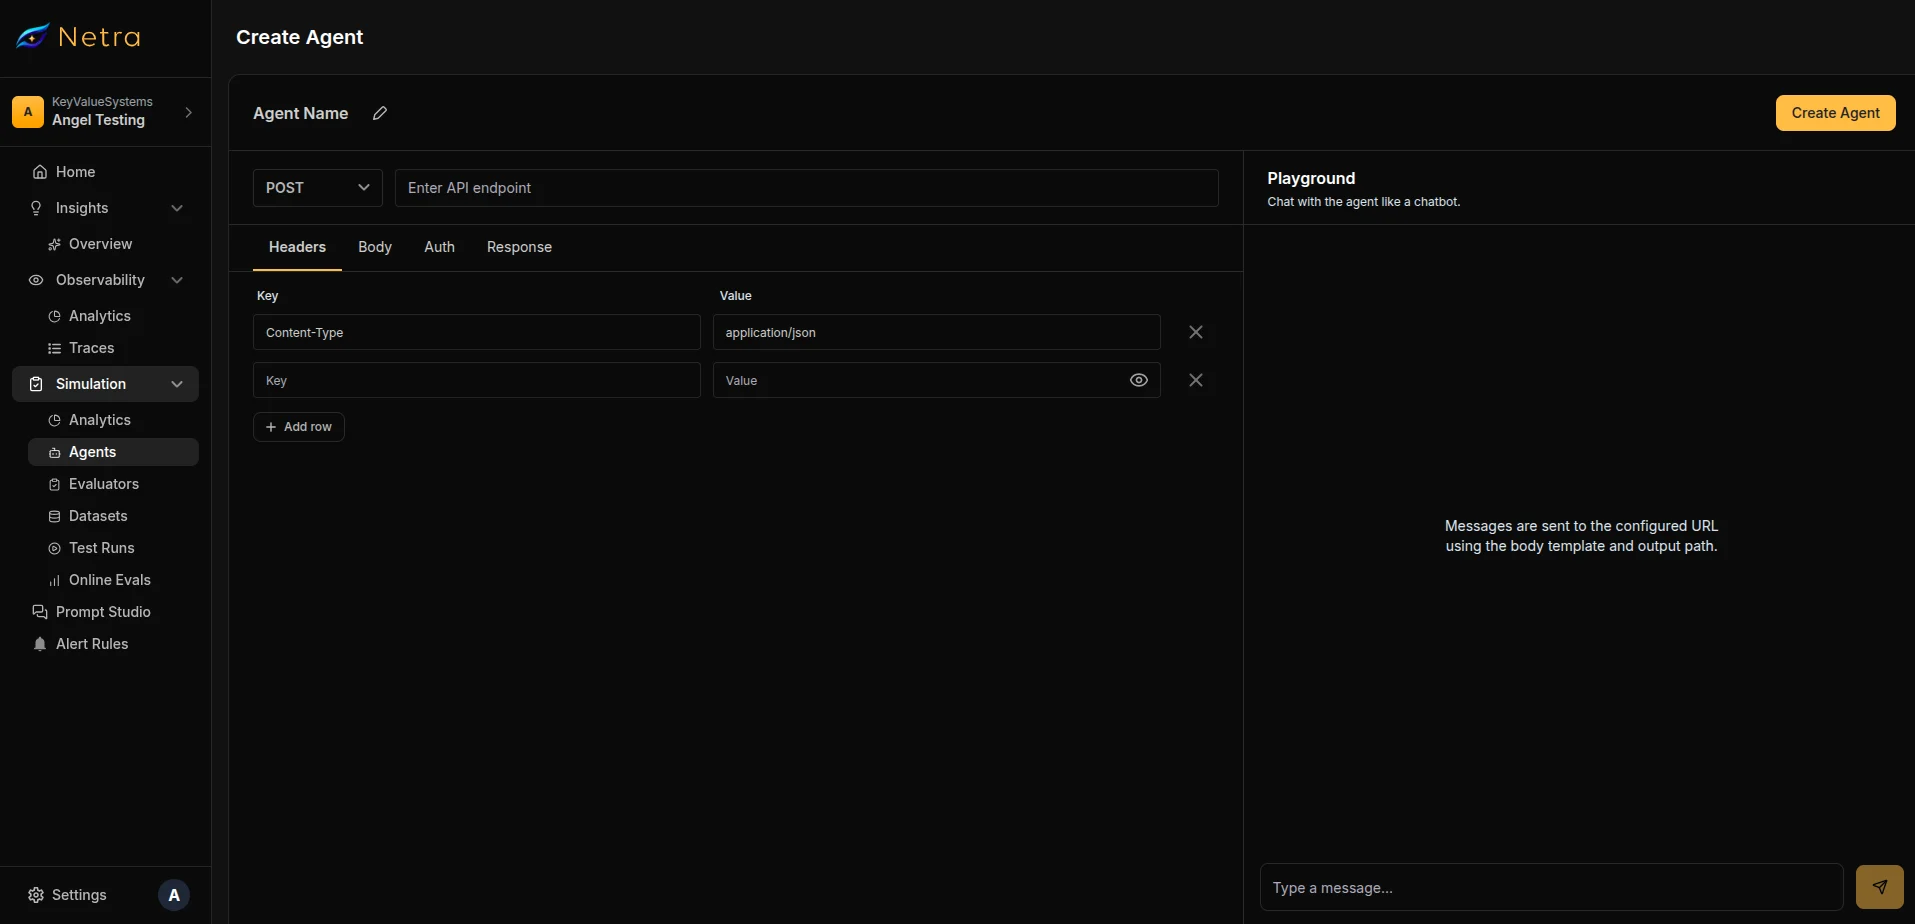 The configuration page is split into two panels—API settings on the left and an interactive Playground on the right.
Enter a descriptive name (e.g., "Customer Support Bot - Staging"). This name identifies the agent when selecting it for test suite runs.
Choose the HTTP method and enter your agent's endpoint URL.
| Method | Typical Use |
| --------------- | ---------------------------------------------------- |
| **POST** | Most common—send user messages in the request body |
| **GET** | Query-based agents with URL parameters |
| **PUT / PATCH** | Agents that update state as part of the conversation |
Add any custom headers your agent requires. A `Content-Type: application/json` header is included by default.
Headers that contain sensitive values (API keys, tokens) are encrypted at rest and masked when viewed by project members.
Choose your authentication method:
| Auth Type | Configuration |
| ---------------- | --------------------------------------------------------------- |
| **No Auth** | No additional credentials required |
| **Bearer Token** | Provide a bearer token, sent as `Authorization: Bearer ` |
| **API Key** | Provide a key name and value, sent as a custom header |
Write a JSON body template using variable placeholders. Netra replaces these with actual values at runtime.
**Default template:**
```json theme={null}
{
"message": "{{userMessage}}",
"session_id": "{{sessionId}}"
}
```
| Variable | Description |
| ----------------- | ----------------------------------------------------------- |
| `{{userMessage}}` | The user message from the dataset item or playground input |
| `{{sessionId}}` | A session identifier for multi-turn conversation continuity |
Structure the body to match your agent's expected request format. Any valid JSON is supported, nest variables at any depth.
Tell Netra where to find the agent's response in the JSON output using JSONPath expressions.
| Field | Required | Example | Description |
| ---------------- | -------- | -------------- | -------------------------------------------------- |
| **Text Path** | Yes | `$.response` | JSONPath to the agent's text reply |
| **Session Path** | No | `$.session_id` | JSONPath to a session ID for multi-turn continuity |
The text path must start with `$.` and point to the field containing the agent's response text.
Click **Create Agent** to save the configuration. The agent becomes available for test suite runs and appears on the Agents dashboard.
## Testing in the Playground
The Playground is an interactive chat panel on the right side of the agent configuration page. Use it to validate your endpoint configuration before running full evaluations.
### Sending Messages
1. Type a message in the input field at the bottom of the Playground panel
2. Press **Enter** or click the send button
3. Netra constructs the HTTP request using your configuration, calls your agent, and displays the response
### What Happens Behind the Scenes
When you send a playground message:
1. Netra resolves your body template: replacing `{{userMessage}}` with your input and `{{sessionId}}` with the current session
2. An async job is created and your agent's endpoint is called via HTTP
3. The response is parsed using your configured **Text Path** to extract the reply
4. If a **Session Path** is configured, the session ID is stored for subsequent messages in the same conversation
### Multi-Turn Conversations
The Playground maintains conversation context through sessions. Each message in the same Playground session includes the `sessionId` from the previous response, enabling multi-turn conversations with stateful agents.
Click **New Chat** to reset the session and start a fresh conversation.
Validation runs before each message is sent. The agent name, base URL, and response text path are required. If the body template contains invalid JSON, you'll see an error before the message is dispatched.
## Triggering a Test Suite Run
This is the primary workflow for the Agent Trigger feature: running an entire [Dataset](/Simulation/Datasets) against a configured agent from the UI.
### Prerequisites
Before triggering a run, ensure you have:
* At least one [Agent](#configuring-an-agent) configured in the current project
* A [Dataset](/Simulation/Datasets) with items (single-turn) or scenarios (multi-turn)
* [Evaluators](/Simulation/Evaluators) attached to the dataset for scoring
### Starting a Run
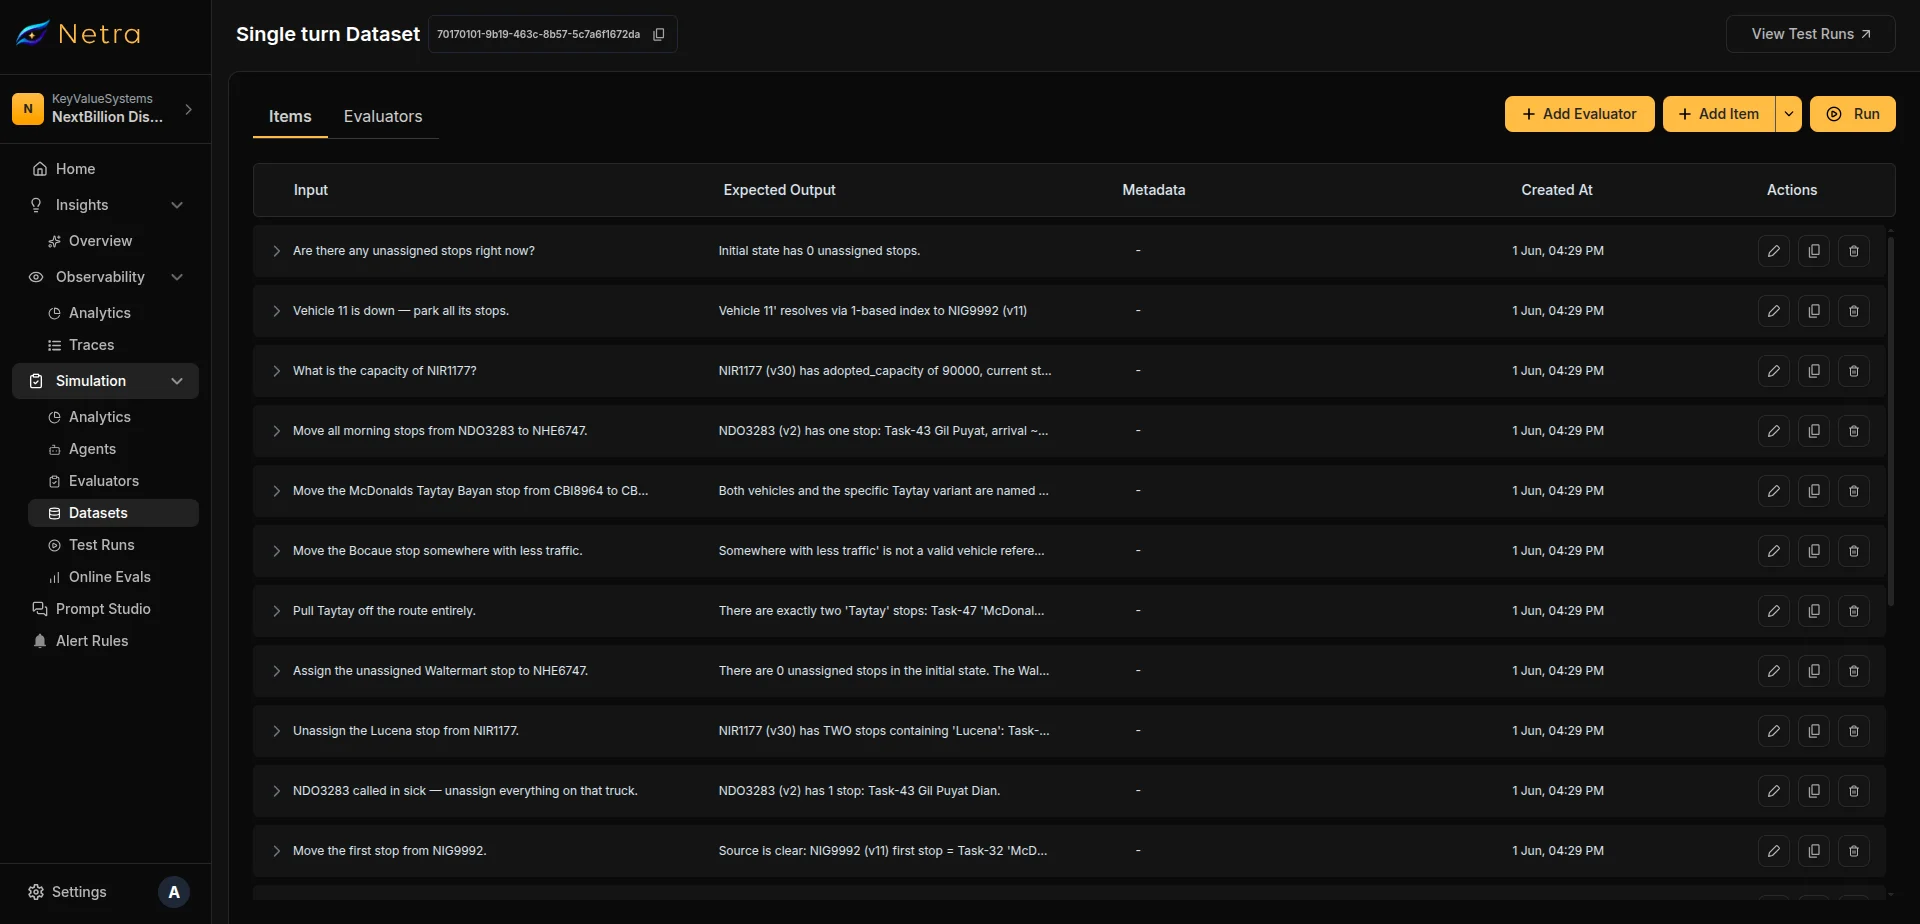
Navigate to **Simulation → Datasets** and open the dataset you want to evaluate.
In the dataset detail page toolbar, click the **Run** button.
The configuration page is split into two panels—API settings on the left and an interactive Playground on the right.
Enter a descriptive name (e.g., "Customer Support Bot - Staging"). This name identifies the agent when selecting it for test suite runs.
Choose the HTTP method and enter your agent's endpoint URL.
| Method | Typical Use |
| --------------- | ---------------------------------------------------- |
| **POST** | Most common—send user messages in the request body |
| **GET** | Query-based agents with URL parameters |
| **PUT / PATCH** | Agents that update state as part of the conversation |
Add any custom headers your agent requires. A `Content-Type: application/json` header is included by default.
Headers that contain sensitive values (API keys, tokens) are encrypted at rest and masked when viewed by project members.
Choose your authentication method:
| Auth Type | Configuration |
| ---------------- | --------------------------------------------------------------- |
| **No Auth** | No additional credentials required |
| **Bearer Token** | Provide a bearer token, sent as `Authorization: Bearer ` |
| **API Key** | Provide a key name and value, sent as a custom header |
Write a JSON body template using variable placeholders. Netra replaces these with actual values at runtime.
**Default template:**
```json theme={null}
{
"message": "{{userMessage}}",
"session_id": "{{sessionId}}"
}
```
| Variable | Description |
| ----------------- | ----------------------------------------------------------- |
| `{{userMessage}}` | The user message from the dataset item or playground input |
| `{{sessionId}}` | A session identifier for multi-turn conversation continuity |
Structure the body to match your agent's expected request format. Any valid JSON is supported, nest variables at any depth.
Tell Netra where to find the agent's response in the JSON output using JSONPath expressions.
| Field | Required | Example | Description |
| ---------------- | -------- | -------------- | -------------------------------------------------- |
| **Text Path** | Yes | `$.response` | JSONPath to the agent's text reply |
| **Session Path** | No | `$.session_id` | JSONPath to a session ID for multi-turn continuity |
The text path must start with `$.` and point to the field containing the agent's response text.
Click **Create Agent** to save the configuration. The agent becomes available for test suite runs and appears on the Agents dashboard.
## Testing in the Playground
The Playground is an interactive chat panel on the right side of the agent configuration page. Use it to validate your endpoint configuration before running full evaluations.
### Sending Messages
1. Type a message in the input field at the bottom of the Playground panel
2. Press **Enter** or click the send button
3. Netra constructs the HTTP request using your configuration, calls your agent, and displays the response
### What Happens Behind the Scenes
When you send a playground message:
1. Netra resolves your body template: replacing `{{userMessage}}` with your input and `{{sessionId}}` with the current session
2. An async job is created and your agent's endpoint is called via HTTP
3. The response is parsed using your configured **Text Path** to extract the reply
4. If a **Session Path** is configured, the session ID is stored for subsequent messages in the same conversation
### Multi-Turn Conversations
The Playground maintains conversation context through sessions. Each message in the same Playground session includes the `sessionId` from the previous response, enabling multi-turn conversations with stateful agents.
Click **New Chat** to reset the session and start a fresh conversation.
Validation runs before each message is sent. The agent name, base URL, and response text path are required. If the body template contains invalid JSON, you'll see an error before the message is dispatched.
## Triggering a Test Suite Run
This is the primary workflow for the Agent Trigger feature: running an entire [Dataset](/Simulation/Datasets) against a configured agent from the UI.
### Prerequisites
Before triggering a run, ensure you have:
* At least one [Agent](#configuring-an-agent) configured in the current project
* A [Dataset](/Simulation/Datasets) with items (single-turn) or scenarios (multi-turn)
* [Evaluators](/Simulation/Evaluators) attached to the dataset for scoring
### Starting a Run
Navigate to **Simulation → Datasets** and open the dataset you want to evaluate.
In the dataset detail page toolbar, click the **Run** button.
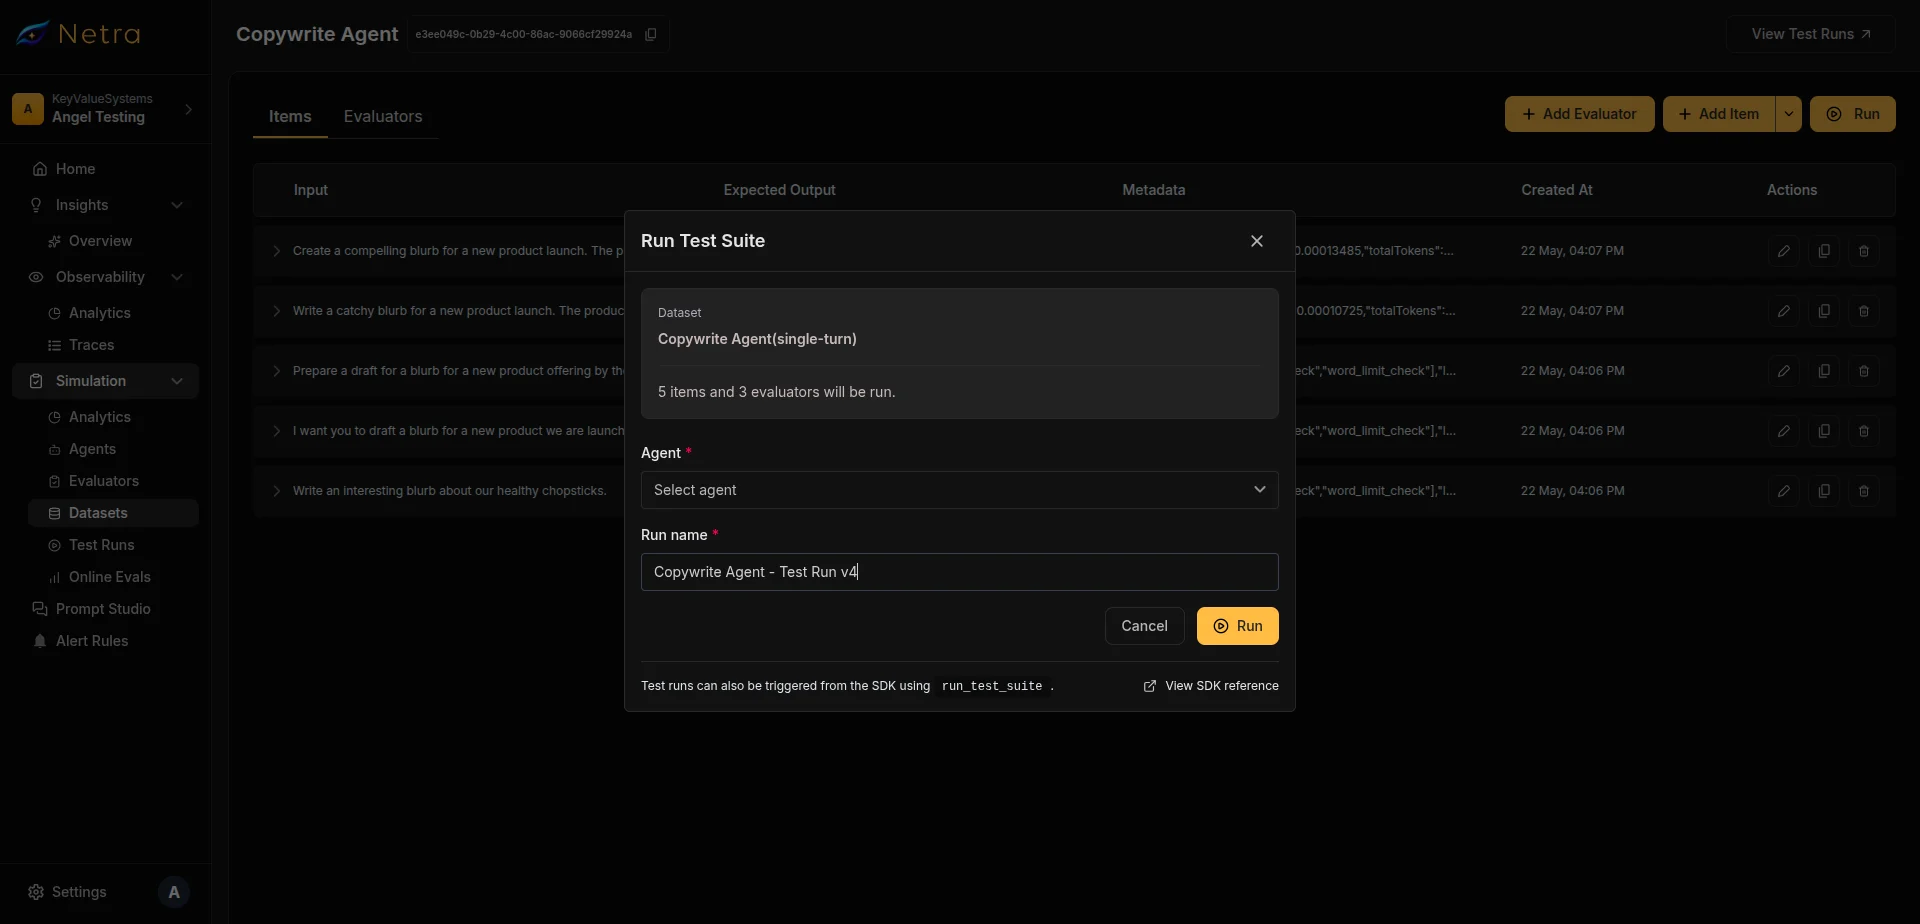
 The Run Test Suite modal appears with the following fields:
| Field | Required | Description |
| ------------ | -------- | ----------------------------------------------------- |
| **Agent** | Yes | Select a configured agent from the dropdown |
| **Run Name** | Yes | Auto-generated as `{Dataset Name} - {Date}`, editable |
The modal also displays read-only context: dataset name, turn type (single or multi), record count, and evaluator count.
The Run Test Suite modal appears with the following fields:
| Field | Required | Description |
| ------------ | -------- | ----------------------------------------------------- |
| **Agent** | Yes | Select a configured agent from the dropdown |
| **Run Name** | Yes | Auto-generated as `{Dataset Name} - {Date}`, editable |
The modal also displays read-only context: dataset name, turn type (single or multi), record count, and evaluator count.
 Click **Run** to trigger the test suite. On success, you are redirected to the [Test Run](/Simulation/TestRuns) detail page to monitor progress.
You can also trigger test suite runs programmatically using the SDK—call `run_test_suite` for single-turn datasets or `run_simulation` for multi-turn datasets. See the [SDK Reference](/sdk-reference/simulation/python) for details.
###
## Monitoring Results
After triggering a run, you land on the [Test Run](/Simulation/TestRuns) detail page. The page updates as items complete.
### Status Summary
The summary card at the top shows aggregate metrics:
| Metric | Description |
| ------------------- | ------------------------------------------------ |
| **Passed / Failed** | Number of items that passed or failed evaluation |
| **Not Available** | Items where evaluation could not complete |
| **Total Cost** | Aggregate cost across all agent calls |
| **Average Latency** | Mean response time from your agent |
| **Duration** | Total wall-clock time for the run |
Use the refresh button to update the summary while the run is in progress.
### Run Statuses
| Status | Meaning |
| ------------- | -------------------------------------------------------------------- |
| **Running** | Items are still being processed |
| **Completed** | All items have finished and evaluations are scored |
| **Failed** | All items failed—check agent configuration and endpoint availability |
| **Cancelled** | The run was manually stopped |
### Per-Item Results
Each item in the results table shows:
| Column | Description |
| ------------------- | ----------------------------------------------- |
| **Input** | The original dataset item input |
| **Expected Output** | The ground truth from the dataset (if provided) |
| **Agent Output** | The response from your agent |
| **Run Status** | Whether the agent call succeeded or failed |
| **Eval Status** | Whether the item passed or failed evaluations |
| **Trace** | Link to the execution trace for debugging |
Click any row to view detailed evaluation results, variable comparisons, or the full multi-turn conversation transcript.
## Related
* [Simulation Overview](/Simulation/Simulation-overview) — Understand the full simulation framework
* [Datasets](/Simulation/Datasets) — Create test cases to run against your agents
* [Evaluators](/Simulation/Evaluators) — Configure scoring logic for agent responses
* [Test Runs](/Simulation/TestRuns) — View detailed evaluation results and conversation transcripts
* [Quick Start: Simulation](/quick-start/QuickStart_Simulation) — Get your first simulation running in minutes
Click **Run** to trigger the test suite. On success, you are redirected to the [Test Run](/Simulation/TestRuns) detail page to monitor progress.
You can also trigger test suite runs programmatically using the SDK—call `run_test_suite` for single-turn datasets or `run_simulation` for multi-turn datasets. See the [SDK Reference](/sdk-reference/simulation/python) for details.
###
## Monitoring Results
After triggering a run, you land on the [Test Run](/Simulation/TestRuns) detail page. The page updates as items complete.
### Status Summary
The summary card at the top shows aggregate metrics:
| Metric | Description |
| ------------------- | ------------------------------------------------ |
| **Passed / Failed** | Number of items that passed or failed evaluation |
| **Not Available** | Items where evaluation could not complete |
| **Total Cost** | Aggregate cost across all agent calls |
| **Average Latency** | Mean response time from your agent |
| **Duration** | Total wall-clock time for the run |
Use the refresh button to update the summary while the run is in progress.
### Run Statuses
| Status | Meaning |
| ------------- | -------------------------------------------------------------------- |
| **Running** | Items are still being processed |
| **Completed** | All items have finished and evaluations are scored |
| **Failed** | All items failed—check agent configuration and endpoint availability |
| **Cancelled** | The run was manually stopped |
### Per-Item Results
Each item in the results table shows:
| Column | Description |
| ------------------- | ----------------------------------------------- |
| **Input** | The original dataset item input |
| **Expected Output** | The ground truth from the dataset (if provided) |
| **Agent Output** | The response from your agent |
| **Run Status** | Whether the agent call succeeded or failed |
| **Eval Status** | Whether the item passed or failed evaluations |
| **Trace** | Link to the execution trace for debugging |
Click any row to view detailed evaluation results, variable comparisons, or the full multi-turn conversation transcript.
## Related
* [Simulation Overview](/Simulation/Simulation-overview) — Understand the full simulation framework
* [Datasets](/Simulation/Datasets) — Create test cases to run against your agents
* [Evaluators](/Simulation/Evaluators) — Configure scoring logic for agent responses
* [Test Runs](/Simulation/TestRuns) — View detailed evaluation results and conversation transcripts
* [Quick Start: Simulation](/quick-start/QuickStart_Simulation) — Get your first simulation running in minutes