> ## Documentation Index
> Fetch the complete documentation index at: https://docs.getnetra.ai/llms.txt
> Use this file to discover all available pages before exploring further.
# Project Settings
> Configure your Netra project settings, manage team members, set up data exports, and connect integrations. Control project-level access and API keys.
Your project's command center. Manage team access, API keys, model configurations, and data exports — all from one place.
# General
Set up the basics for your project:
* **Project Name**: Edit your project's display name
* **Project ID**: View and copy your unique project identifier (read-only)
**Want to switch projects?** Head to the **Analytics Dashboard** and click your current **Project Name** at the top of the left nav panel. A dropdown will reveal all your available projects — just pick one to switch instantly.
# Members
See who has access to your project at a glance. This section shows **Project Members** and **Project Admins** — the people actively collaborating within this project.
For each member, you can view:
| Detail | Description |
| ---------------- | -------------------------------------- |
| **Name & Email** | Member's identity and contact |
| **Role** | Project Member or Project Admin |
| **Access Level** | Permissions granted within the project |
| **Last Active** | When they were last seen |
Looking for **Organization Owners**? They won't appear here. Head over to [Organization Settings — Members](/Account-settings/Organisation#members) to view and manage them.
### Adding Members
Click **"Add Members"** to bring new collaborators into the project — search by name or email, select the members you need, and hit save. They'll be notified right away.
# API Keys
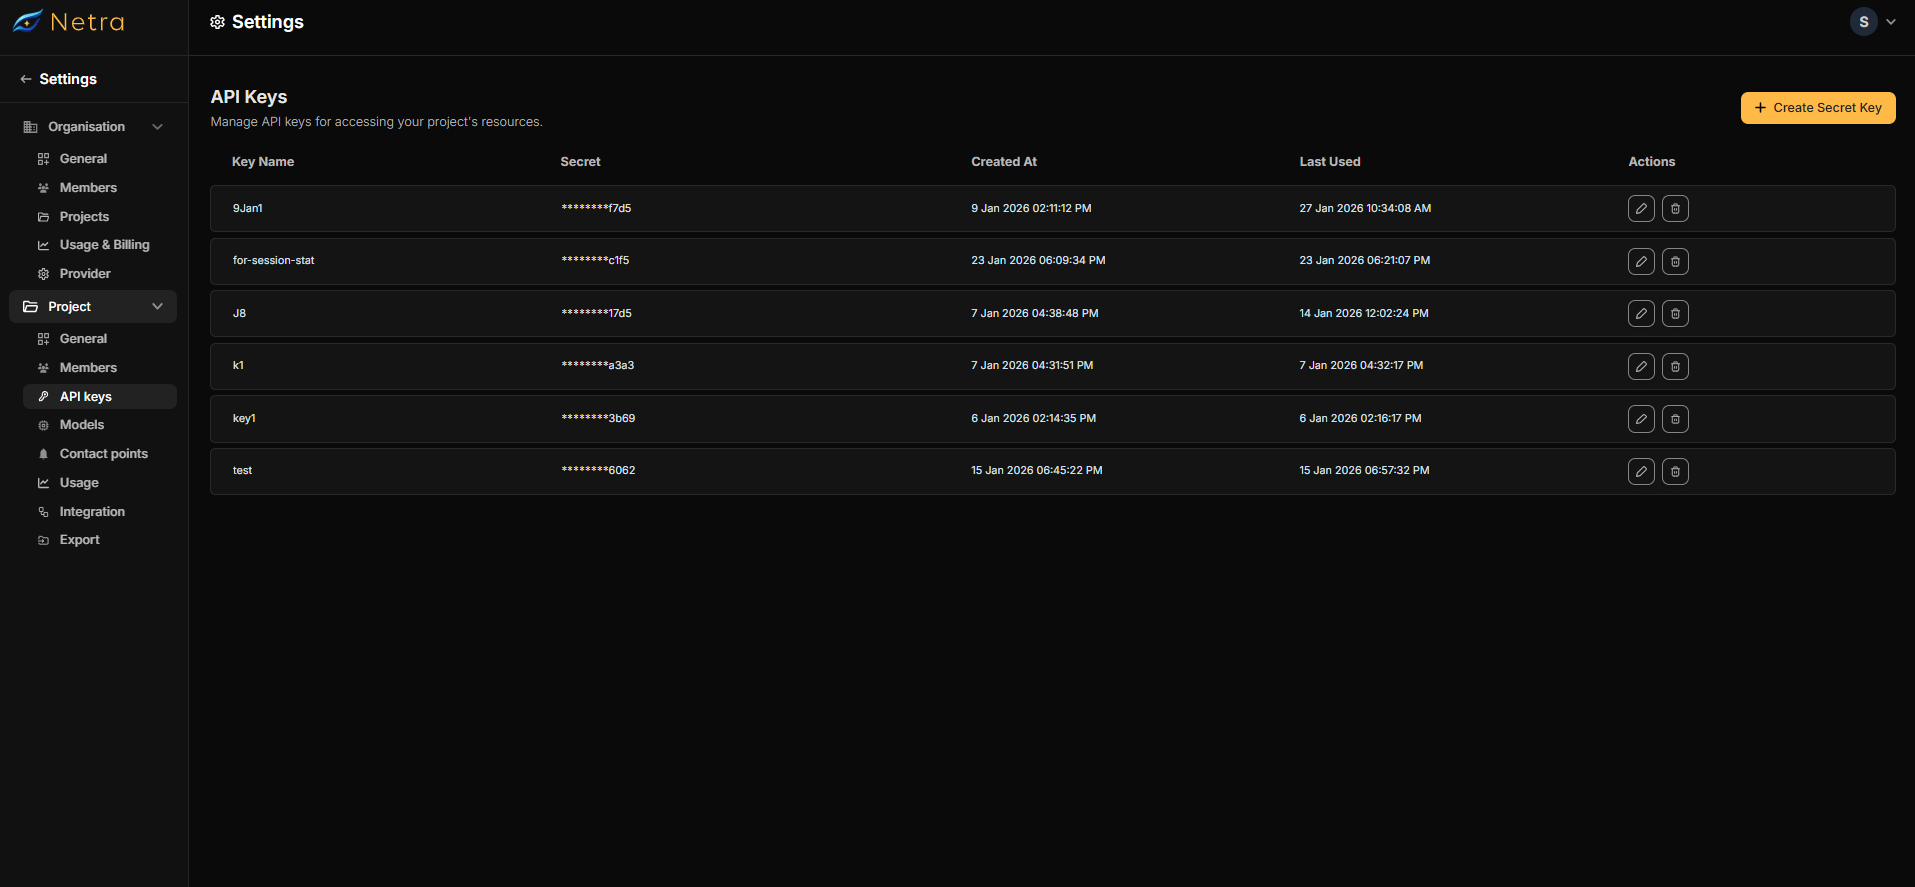 Your keys to programmatic access. Each API key listed here shows its name, prefix, creation date, last usage, and quick actions to edit or delete.
### Creating a New API Key
Click **"Create Secret Key"** in the API Keys section.
Give it a descriptive name so you can easily identify its purpose later.
Copy the generated key immediately and store it somewhere safe — the full key won't be shown again.
### Managing Existing Keys
* **Edit**: Rename a key for better identification
* **Delete**: Revoke access by removing keys you no longer need
# Models
Your keys to programmatic access. Each API key listed here shows its name, prefix, creation date, last usage, and quick actions to edit or delete.
### Creating a New API Key
Click **"Create Secret Key"** in the API Keys section.
Give it a descriptive name so you can easily identify its purpose later.
Copy the generated key immediately and store it somewhere safe — the full key won't be shown again.
### Managing Existing Keys
* **Edit**: Rename a key for better identification
* **Delete**: Revoke access by removing keys you no longer need
# Models
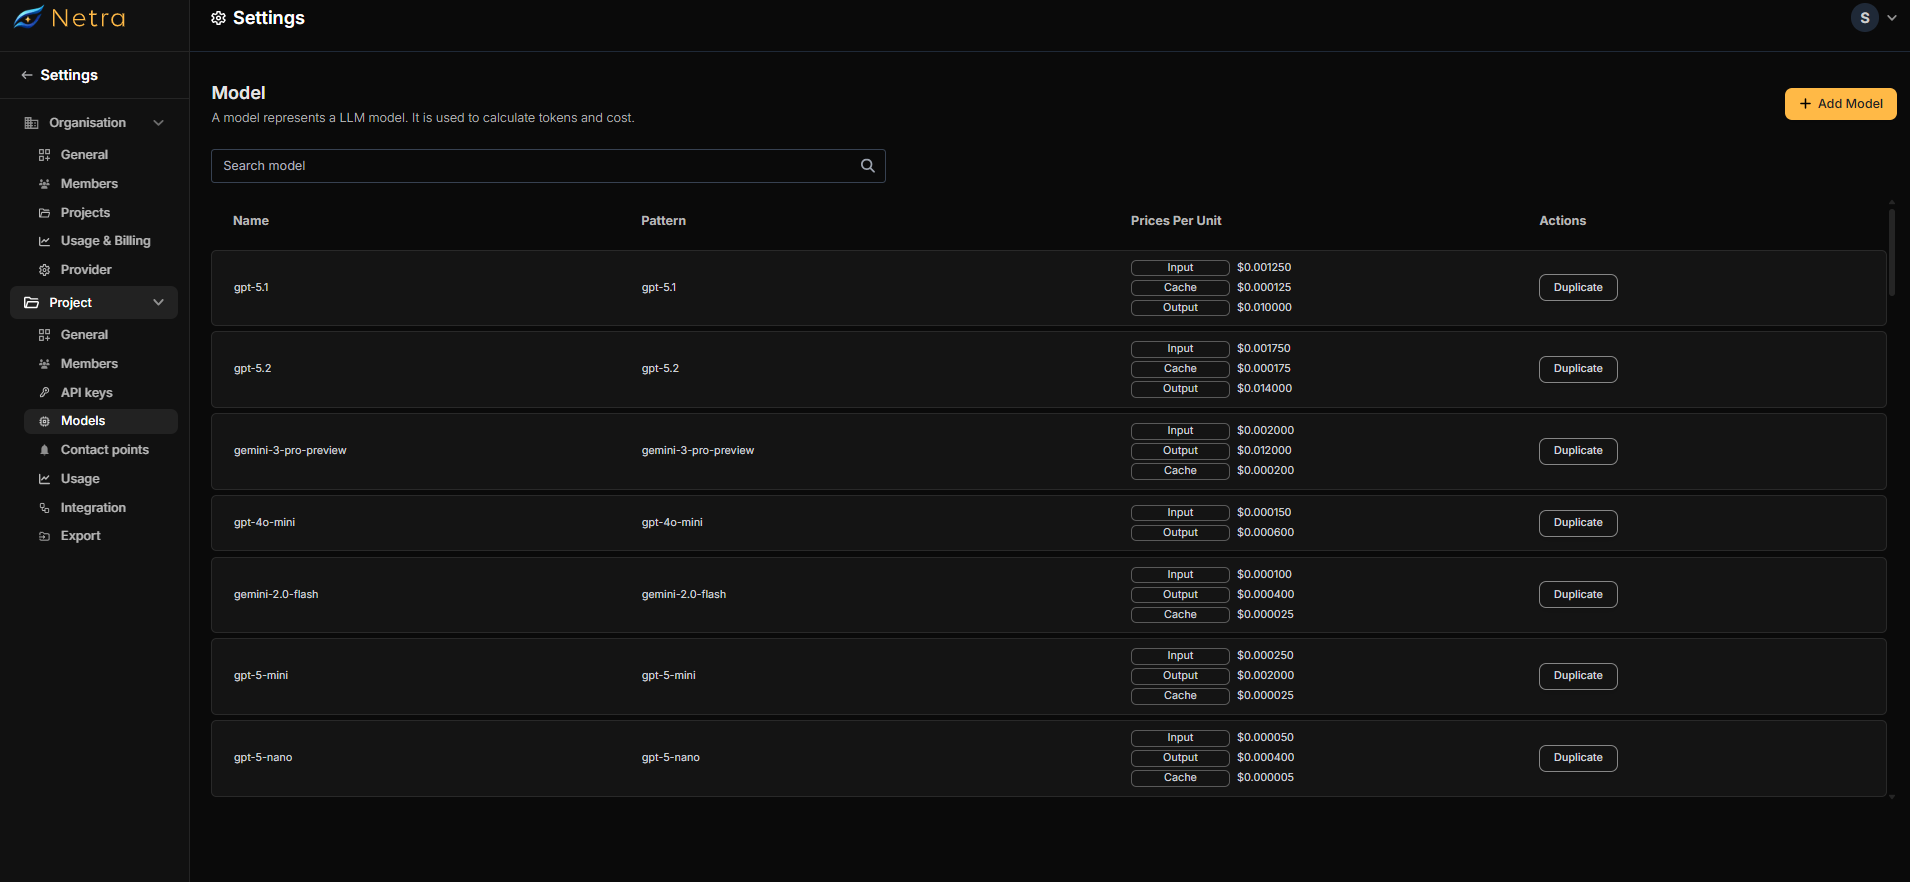 Keep tabs on every language model in your project. At a glance, you can track token consumption and cost of usage across all configured models.
### Adding a New Model
Keep tabs on every language model in your project. At a glance, you can track token consumption and cost of usage across all configured models.
### Adding a New Model
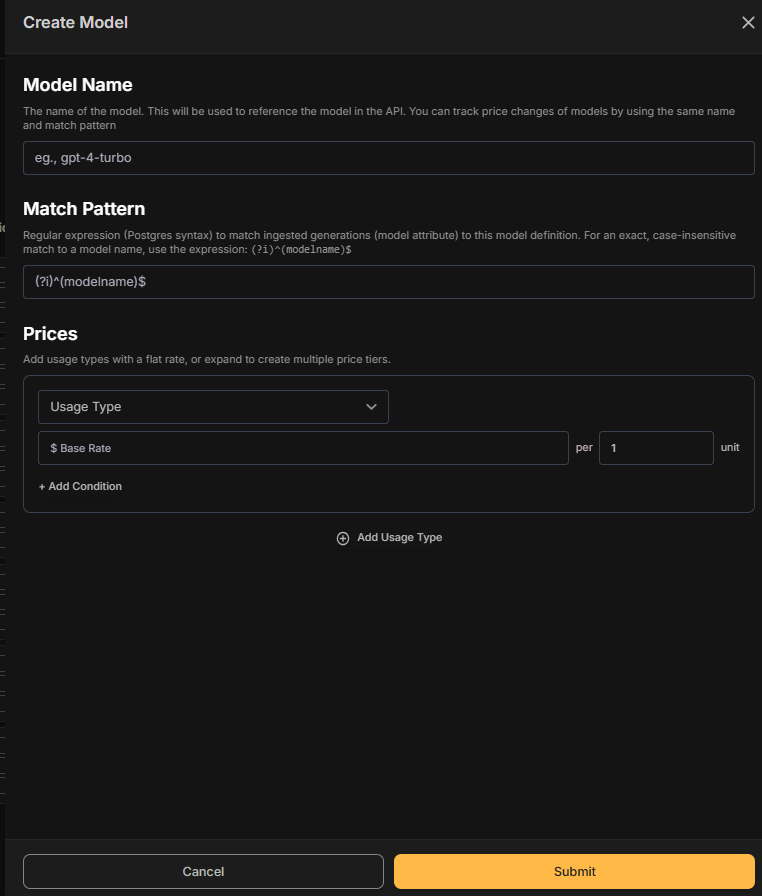 Click **"Add Model"** to begin.
* **Model Name**: The name used in API calls and for tracking price changes.
* **Match Pattern**: Define how this model matches incoming data using Postgres regex syntax.
* Example: `(?i)^(modelname)$` for exact case-insensitive matching.
Add rate cards for the usage types that apply — input tokens, output tokens, caching, audio duration, or character count.
### Managing Existing Models
* **Duplicate**: Need a similar model? Duplicate an existing one and tweak the parameters and pricing to fit.
# Contact Points
Click **"Add Model"** to begin.
* **Model Name**: The name used in API calls and for tracking price changes.
* **Match Pattern**: Define how this model matches incoming data using Postgres regex syntax.
* Example: `(?i)^(modelname)$` for exact case-insensitive matching.
Add rate cards for the usage types that apply — input tokens, output tokens, caching, audio duration, or character count.
### Managing Existing Models
* **Duplicate**: Need a similar model? Duplicate an existing one and tweak the parameters and pricing to fit.
# Contact Points
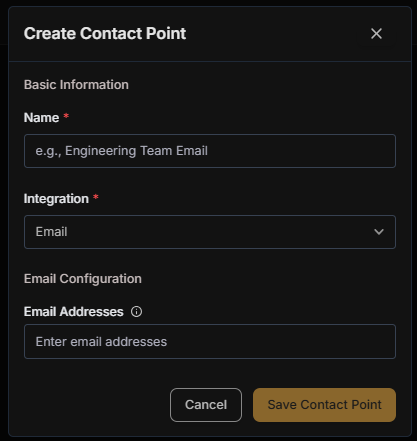
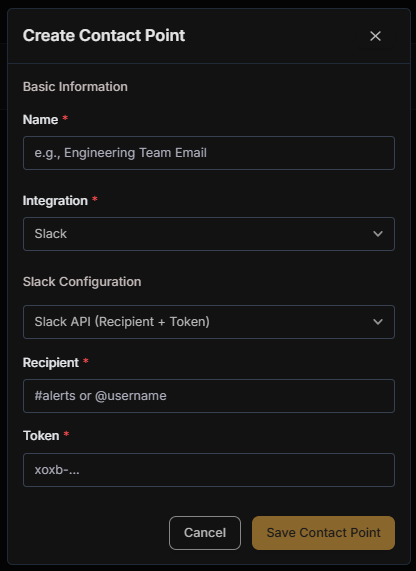
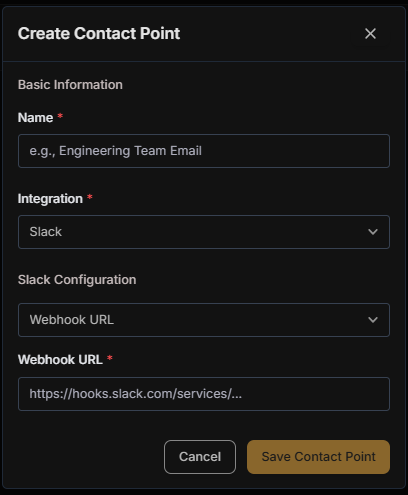 Decide where your alerts land — email inboxes, Slack channels, or both. Contact points are the destinations that get notified when something needs your attention.
### Setting Up a Contact Point
Click **"Create Contact Point"** to get started.
Choose how you want to be notified:
* **Email** — alerts sent directly to specified addresses
* **Slack** — notifications posted to your team's workspace
* For **Email**: Enter the recipient addresses
* For **Slack**: Connect your workspace and pick a channel
Fire off a test notification to make sure everything works, then save your configuration.
# Usage
Decide where your alerts land — email inboxes, Slack channels, or both. Contact points are the destinations that get notified when something needs your attention.
### Setting Up a Contact Point
Click **"Create Contact Point"** to get started.
Choose how you want to be notified:
* **Email** — alerts sent directly to specified addresses
* **Slack** — notifications posted to your team's workspace
* For **Email**: Enter the recipient addresses
* For **Slack**: Connect your workspace and pick a channel
Fire off a test notification to make sure everything works, then save your configuration.
# Usage
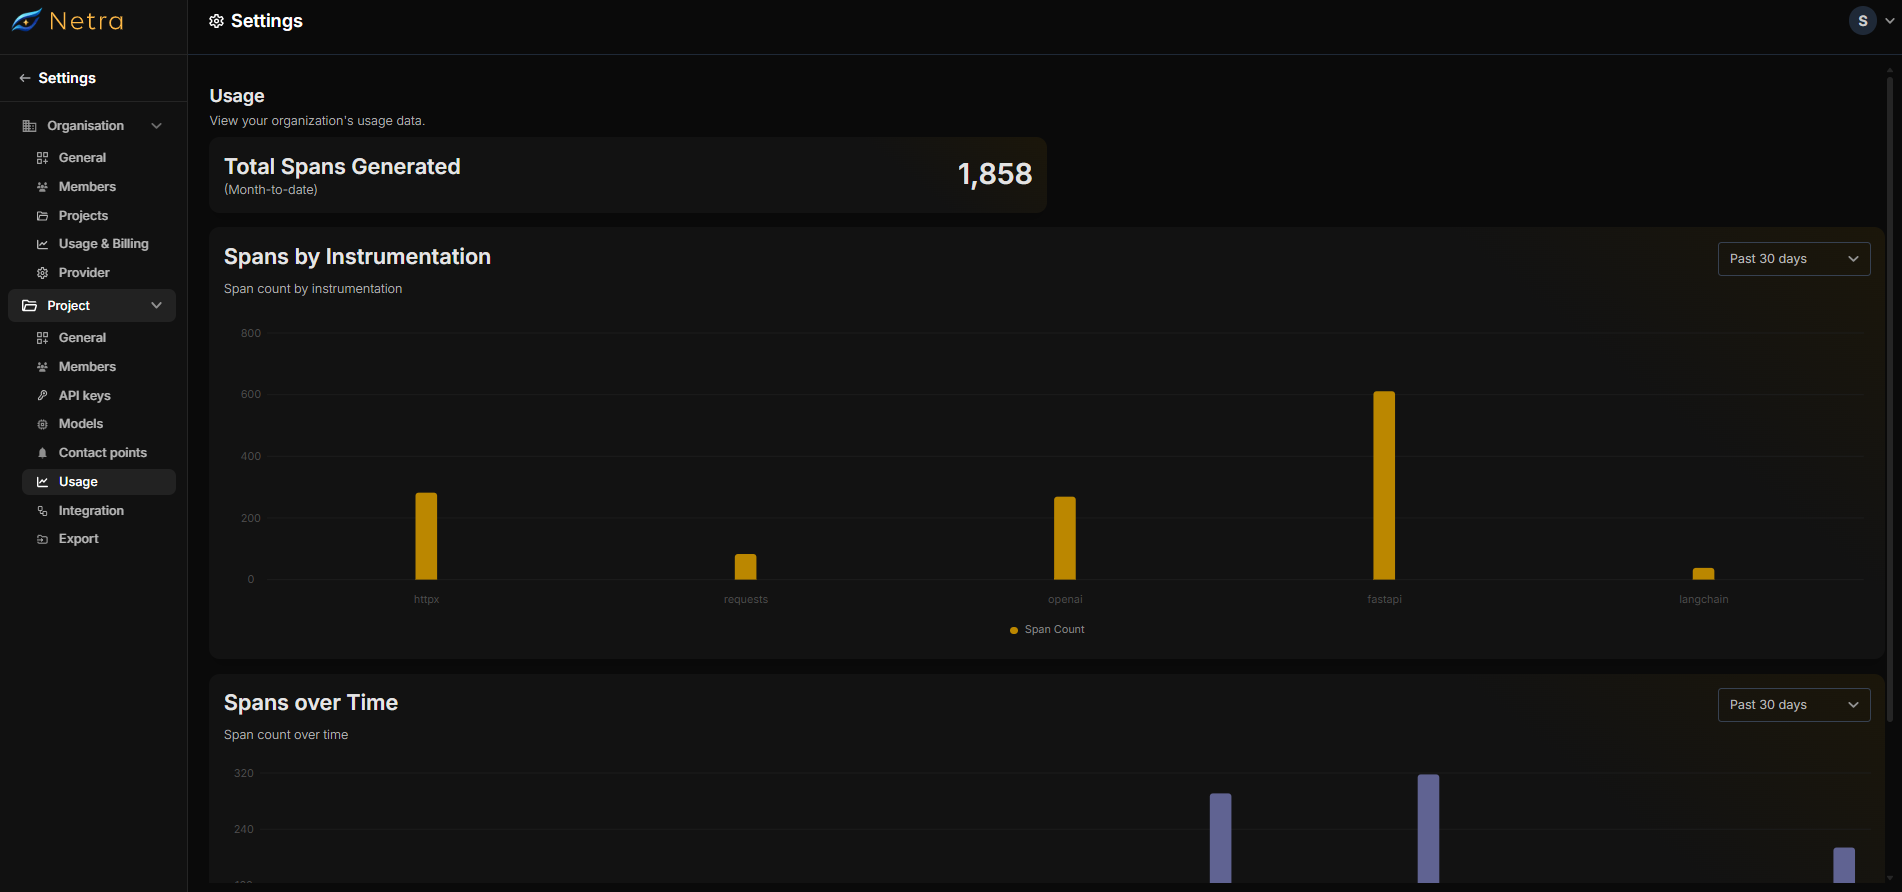 See exactly how your project is performing. The Usage section gives you a real-time view of resource consumption through **Span Analytics**:
| Metric | What it tells you |
| ---------------------- | ---------------------------------------------------- |
| **Total Spans** | Overall volume of spans generated |
| **Trends Over Time** | How usage is changing day to day |
| **By Instrumentation** | Which instrumentations are driving the most activity |
| **Performance** | Key performance indicators at a glance |
# Integration
Integrations allow you to connect external services to your project for exporting and storing observability data generated by Netra. Once configured, these integrations can be used as destinations for scheduled exports, enabling long-term storage, external analysis, or compliance workflows outside the Netra platform.
See exactly how your project is performing. The Usage section gives you a real-time view of resource consumption through **Span Analytics**:
| Metric | What it tells you |
| ---------------------- | ---------------------------------------------------- |
| **Total Spans** | Overall volume of spans generated |
| **Trends Over Time** | How usage is changing day to day |
| **By Instrumentation** | Which instrumentations are driving the most activity |
| **Performance** | Key performance indicators at a glance |
# Integration
Integrations allow you to connect external services to your project for exporting and storing observability data generated by Netra. Once configured, these integrations can be used as destinations for scheduled exports, enabling long-term storage, external analysis, or compliance workflows outside the Netra platform.
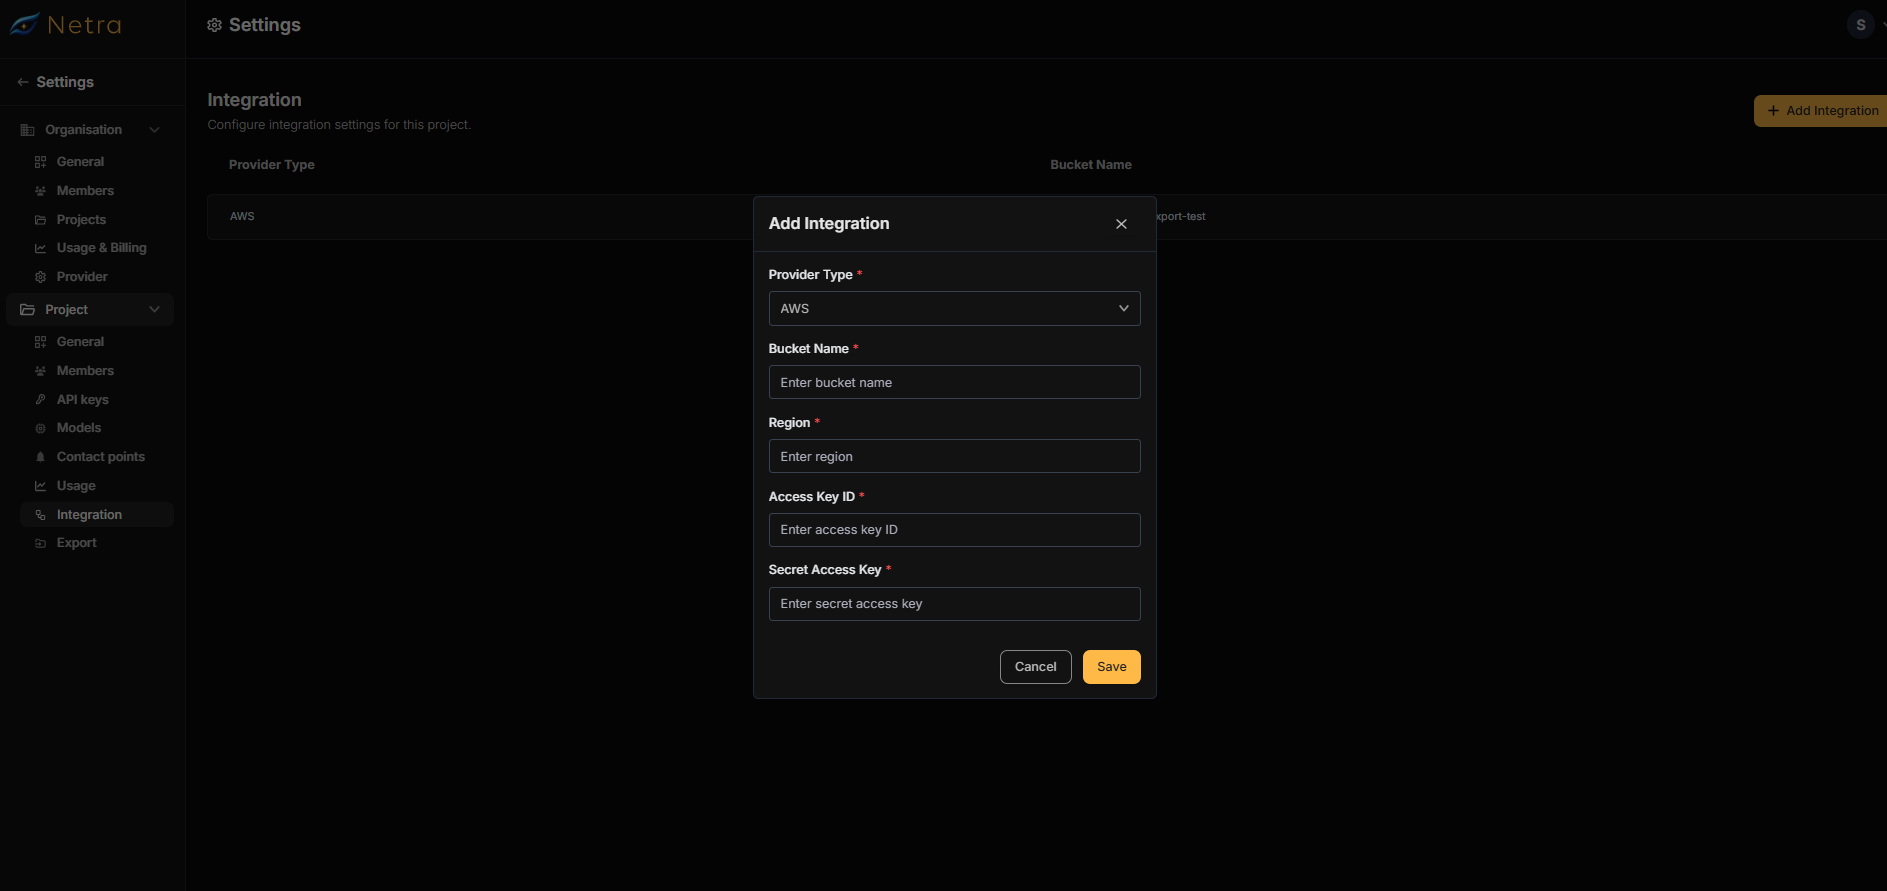 Netra supports major cloud platforms for seamless integration with your existing infrastructure.
***
### Supported Providers
Export data to Amazon S3 buckets with IAM-based authentication.
Export data to Google Cloud Storage buckets with service account authentication.
### Adding an Integration
Navigate to **Project Settings** → **Integration** and click **Add Integration**.
Choose your cloud provider:
| Provider | Description |
| -------- | ----------------------------------------------------- |
| **AWS** | Amazon S3 storage with access key authentication |
| **GCP** | Google Cloud Storage with service account credentials |
Enter your storage bucket information:
| Field | Description | Example |
| --------------- | ---------------------------------------------- | ---------------------------------------- |
| **Bucket Name** | The name of your cloud storage bucket | `my-company-netra-exports` |
| **Region** | Geographic region where your bucket is located | `us-east-1` (AWS) or `us-central1` (GCP) |
Enter your access credentials based on the selected provider:
**Your credentials are secure.** All access keys and secrets are encrypted using industry-standard encryption and stored securely. We never expose or log your credentials in plain text.
| Field | Description |
| --------------------- | ---------------------------------- |
| **Access Key ID** | Your AWS IAM access key identifier |
| **Secret Access Key** | Your AWS IAM secret access key |
**Minimum Permissions Required:**
| Permission | Resource |
| ----------------- | -------------- |
| `s3:ListBucket` | Bucket ARN |
| `s3:PutObject` | Bucket objects |
| `s3:GetObject` | Bucket objects |
| `s3:DeleteObject` | Bucket objects |
We recommend creating a dedicated IAM user with only these permissions scoped to the target bucket.
| Field | Description |
| ----------------------- | --------------------------------------------------- |
| **Service Account Key** | JSON key file contents for your GCP service account |
**Minimum Permissions Required:**
| Role | Resource |
| --------------------------- | ------------- |
| `roles/storage.objectAdmin` | Target bucket |
Create a service account with only the **Storage Object Admin** role scoped to the target bucket.
Click **Save Integration** to store your configuration. Netra will verify the connection by testing bucket access.
Ensure your bucket has the correct permissions before saving. Integration verification will fail if Netra cannot write to the specified bucket.
***
### Integration Listing
The Integration page displays all configured cloud storage connections:
| Column | Description |
| ----------------- | ------------------------------- |
| **Provider Type** | The cloud provider (AWS or GCP) |
| **Bucket Name** | The target storage bucket name |
***
# Export
Netra supports major cloud platforms for seamless integration with your existing infrastructure.
***
### Supported Providers
Export data to Amazon S3 buckets with IAM-based authentication.
Export data to Google Cloud Storage buckets with service account authentication.
### Adding an Integration
Navigate to **Project Settings** → **Integration** and click **Add Integration**.
Choose your cloud provider:
| Provider | Description |
| -------- | ----------------------------------------------------- |
| **AWS** | Amazon S3 storage with access key authentication |
| **GCP** | Google Cloud Storage with service account credentials |
Enter your storage bucket information:
| Field | Description | Example |
| --------------- | ---------------------------------------------- | ---------------------------------------- |
| **Bucket Name** | The name of your cloud storage bucket | `my-company-netra-exports` |
| **Region** | Geographic region where your bucket is located | `us-east-1` (AWS) or `us-central1` (GCP) |
Enter your access credentials based on the selected provider:
**Your credentials are secure.** All access keys and secrets are encrypted using industry-standard encryption and stored securely. We never expose or log your credentials in plain text.
| Field | Description |
| --------------------- | ---------------------------------- |
| **Access Key ID** | Your AWS IAM access key identifier |
| **Secret Access Key** | Your AWS IAM secret access key |
**Minimum Permissions Required:**
| Permission | Resource |
| ----------------- | -------------- |
| `s3:ListBucket` | Bucket ARN |
| `s3:PutObject` | Bucket objects |
| `s3:GetObject` | Bucket objects |
| `s3:DeleteObject` | Bucket objects |
We recommend creating a dedicated IAM user with only these permissions scoped to the target bucket.
| Field | Description |
| ----------------------- | --------------------------------------------------- |
| **Service Account Key** | JSON key file contents for your GCP service account |
**Minimum Permissions Required:**
| Role | Resource |
| --------------------------- | ------------- |
| `roles/storage.objectAdmin` | Target bucket |
Create a service account with only the **Storage Object Admin** role scoped to the target bucket.
Click **Save Integration** to store your configuration. Netra will verify the connection by testing bucket access.
Ensure your bucket has the correct permissions before saving. Integration verification will fail if Netra cannot write to the specified bucket.
***
### Integration Listing
The Integration page displays all configured cloud storage connections:
| Column | Description |
| ----------------- | ------------------------------- |
| **Provider Type** | The cloud provider (AWS or GCP) |
| **Bucket Name** | The target storage bucket name |
***
# Export
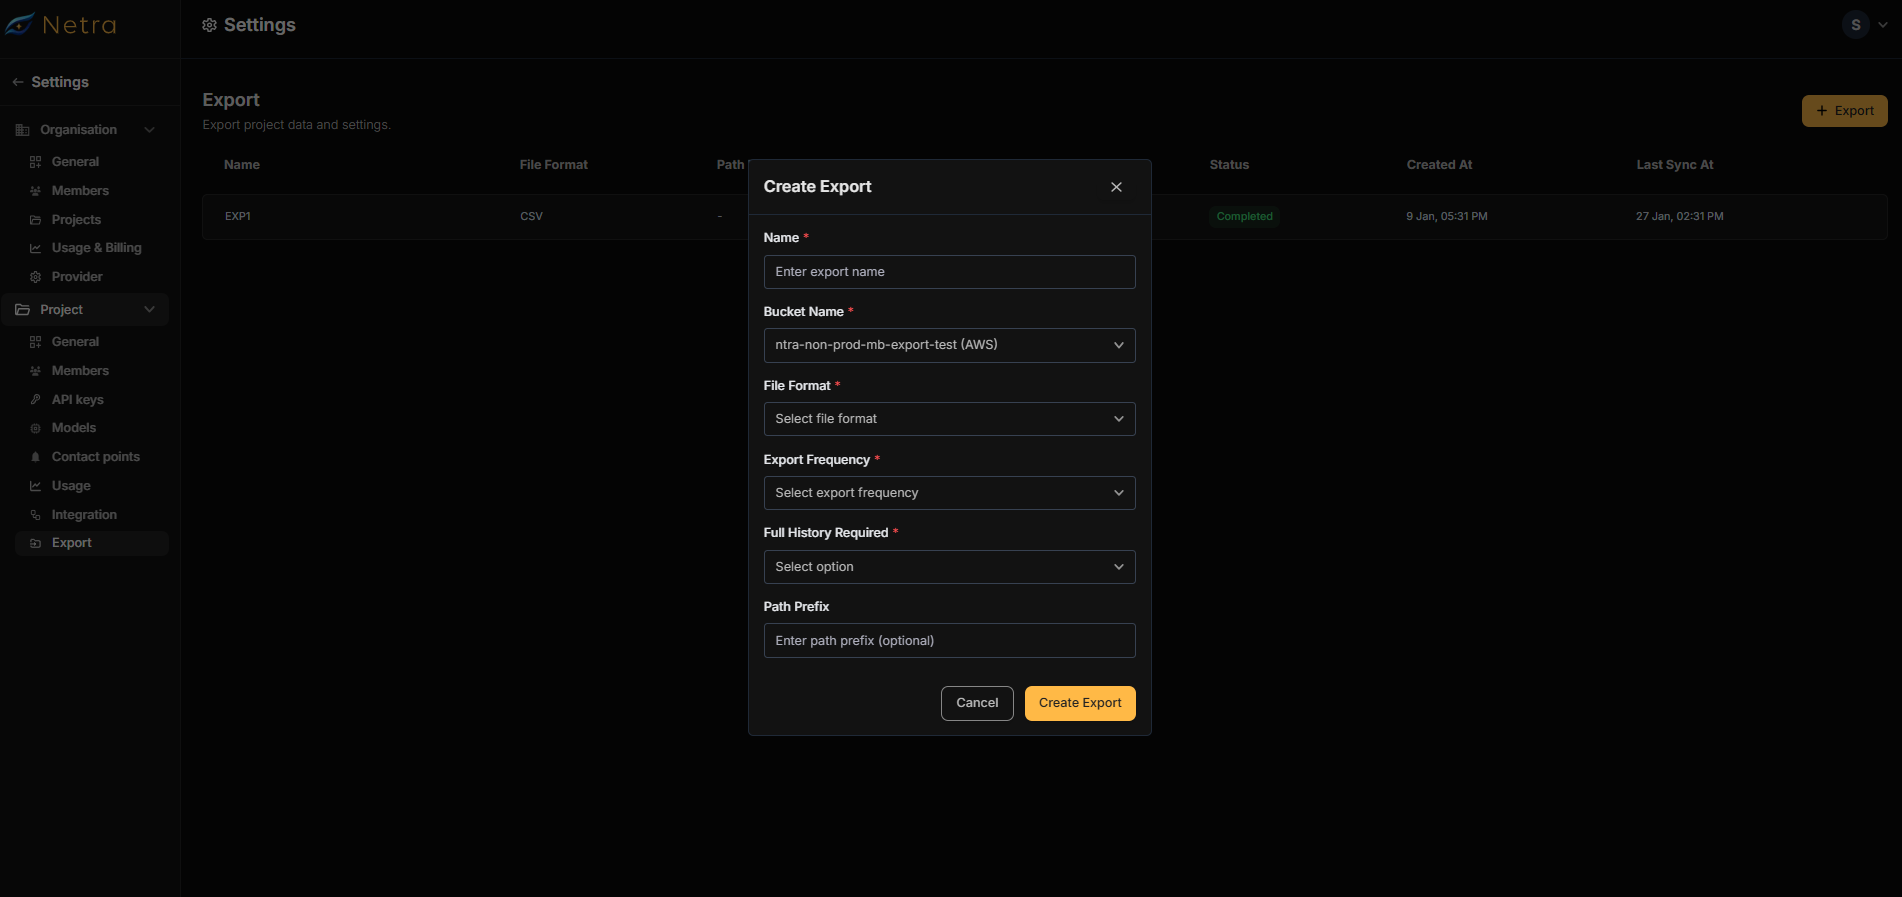 Configure automated data exports to send your observability data to external storage at regular intervals. Exports allow you to maintain long-term archives, integrate with data warehouses, or comply with data retention requirements.
Export hourly or daily based on your needs.
Choose JSON or CSV format for compatibility with your tools.
Optionally export your complete historical data on first run.
***
### Creating an Export
Navigate to **Project Settings** → **Export** and click **Create Export**.
Configure the fundamental export settings:
| Field | Description |
| ---------------------- | -------------------------------------------------------- |
| **Export Name** | A descriptive name to identify this export configuration |
| **Destination Bucket** | Select from your configured integrations |
Choose the output format for your exported data:
| Format | Best For |
| -------- | --------------------------------------------------------------------- |
| **JSON** | Data pipelines, programmatic processing, preserving nested structures |
| **CSV** | Spreadsheet analysis, SQL imports, business intelligence tools |
Set how often data should be exported:
| Frequency | Description |
| ---------- | ------------------------ |
| **Hourly** | Export data every hour |
| **Daily** | Export data once per day |
Choose whether to include historical data:
| Option | Description |
| ------- | --------------------------------------------------------------------- |
| **Yes** | Include all historical data from project creation in the first export |
| **No** | Only export new data from the export creation time onwards |
Exporting full history may result in a large initial export depending on your project's data volume. Subsequent exports will only include incremental data.
Configure the folder structure for exported files:
| Field | Description | Example |
| --------------- | ------------------------------------------------------------ | --------------------------- |
| **Path Prefix** | Directory path within your bucket where files will be stored | `netra/exports/production/` |
**Resulting file path:** `s3://your-bucket/netra/exports/production/2026-01-29/traces_001.json`
Review all settings and click **Create Export** to activate the export schedule.
***
### Export Listing
The Export page displays all configured export jobs with the following information:
| Column | Description |
| ------------------ | -------------------------------------------------- |
| **Export Name** | The name you assigned to identify this export |
| **File Format** | Output format (JSON or CSV) |
| **Path Prefix** | Directory path within the destination bucket |
| **Frequency** | Export schedule (Hourly or Daily) |
| **Status** | Current state of the export (Active, Paused, etc.) |
| **Created At** | When the export configuration was created |
| **Last Synced At** | Timestamp of the most recent successful export |
Configure automated data exports to send your observability data to external storage at regular intervals. Exports allow you to maintain long-term archives, integrate with data warehouses, or comply with data retention requirements.
Export hourly or daily based on your needs.
Choose JSON or CSV format for compatibility with your tools.
Optionally export your complete historical data on first run.
***
### Creating an Export
Navigate to **Project Settings** → **Export** and click **Create Export**.
Configure the fundamental export settings:
| Field | Description |
| ---------------------- | -------------------------------------------------------- |
| **Export Name** | A descriptive name to identify this export configuration |
| **Destination Bucket** | Select from your configured integrations |
Choose the output format for your exported data:
| Format | Best For |
| -------- | --------------------------------------------------------------------- |
| **JSON** | Data pipelines, programmatic processing, preserving nested structures |
| **CSV** | Spreadsheet analysis, SQL imports, business intelligence tools |
Set how often data should be exported:
| Frequency | Description |
| ---------- | ------------------------ |
| **Hourly** | Export data every hour |
| **Daily** | Export data once per day |
Choose whether to include historical data:
| Option | Description |
| ------- | --------------------------------------------------------------------- |
| **Yes** | Include all historical data from project creation in the first export |
| **No** | Only export new data from the export creation time onwards |
Exporting full history may result in a large initial export depending on your project's data volume. Subsequent exports will only include incremental data.
Configure the folder structure for exported files:
| Field | Description | Example |
| --------------- | ------------------------------------------------------------ | --------------------------- |
| **Path Prefix** | Directory path within your bucket where files will be stored | `netra/exports/production/` |
**Resulting file path:** `s3://your-bucket/netra/exports/production/2026-01-29/traces_001.json`
Review all settings and click **Create Export** to activate the export schedule.
***
### Export Listing
The Export page displays all configured export jobs with the following information:
| Column | Description |
| ------------------ | -------------------------------------------------- |
| **Export Name** | The name you assigned to identify this export |
| **File Format** | Output format (JSON or CSV) |
| **Path Prefix** | Directory path within the destination bucket |
| **Frequency** | Export schedule (Hourly or Daily) |
| **Status** | Current state of the export (Active, Paused, etc.) |
| **Created At** | When the export configuration was created |
| **Last Synced At** | Timestamp of the most recent successful export |